Hostinger hPanel Installation Guide
- Introduction
- Prerequisites
- Installation Overview
- Step 1: Create Subdomain
- Step 2: Configure PHP Settings
- Step 3: Upload Installer File
- Step 4: Extract Installer Files
- Step 5: Create Database
- Step 6: Configure Database Connection
- Step 7: Create Admin Account
- Step 8: Deploy Application
- Step 9: Access Admin Panel
- Next Steps
Introduction
This comprehensive guide walks you through installing UddoktaPay on Hostinger's hPanel hosting environment. The installation process is straightforward and takes approximately 15-20 minutes from start to finish.
All screenshots are taken from Hostinger's latest hPanel interface. The interface is modern, intuitive, and consistent across all Hostinger hosting plans.
Prerequisites
Before beginning installation, verify you have the following:
Hosting Requirements:
- Active Hostinger hosting account (Business or higher plan recommended)
- PHP 8.2 or higher with IonCube Loader support
- MySQL 5.7+ or MariaDB 10.3+ database support
- Minimum 512MB PHP memory_limit
- SSL certificate (included free with Hostinger)
Installation Materials:
- Domain or subdomain pointed to your hosting server
- UddoktaPay installer file downloaded from my.uddoktapay.com
- Valid license key from my.uddoktapay.com
System Requirements
Ensure your hosting environment meets all requirements before proceeding. Installation will fail if PHP version or required extensions are missing.
Installation Overview
The installation process follows seven main steps:
- Create Subdomain — Set up dedicated subdomain for UddoktaPay
- Configure PHP — Enable required PHP version and extensions
- Upload Files — Transfer installer package to your server
- Extract Files — Unzip installer in subdomain directory
- Create Database — Set up MySQL database and user
- Run Installer — Configure database connection
- Create Admin — Set up administrator account
Estimated completion time: 15-20 minutes
Step 1: Create Subdomain
Set up a dedicated subdomain for your UddoktaPay installation.
Access Websites Section
- Log into your Hostinger hPanel account
- Click on Websites in the left sidebar
- Click the Add website button in the top right corner

Select Website Type
On the website creation page, you'll see several options:
- Hostinger Horizons (AI-powered website builder)
- WordPress
- Hostinger Website Builder
- Custom PHP/HTML website ← Select this option

Click on Custom PHP/HTML website to proceed.
Configure Domain
- In the domain configuration field, enter your subdomain
- Example:
pay.your-site.com - The system auto-suggests the format as you type
- Example:
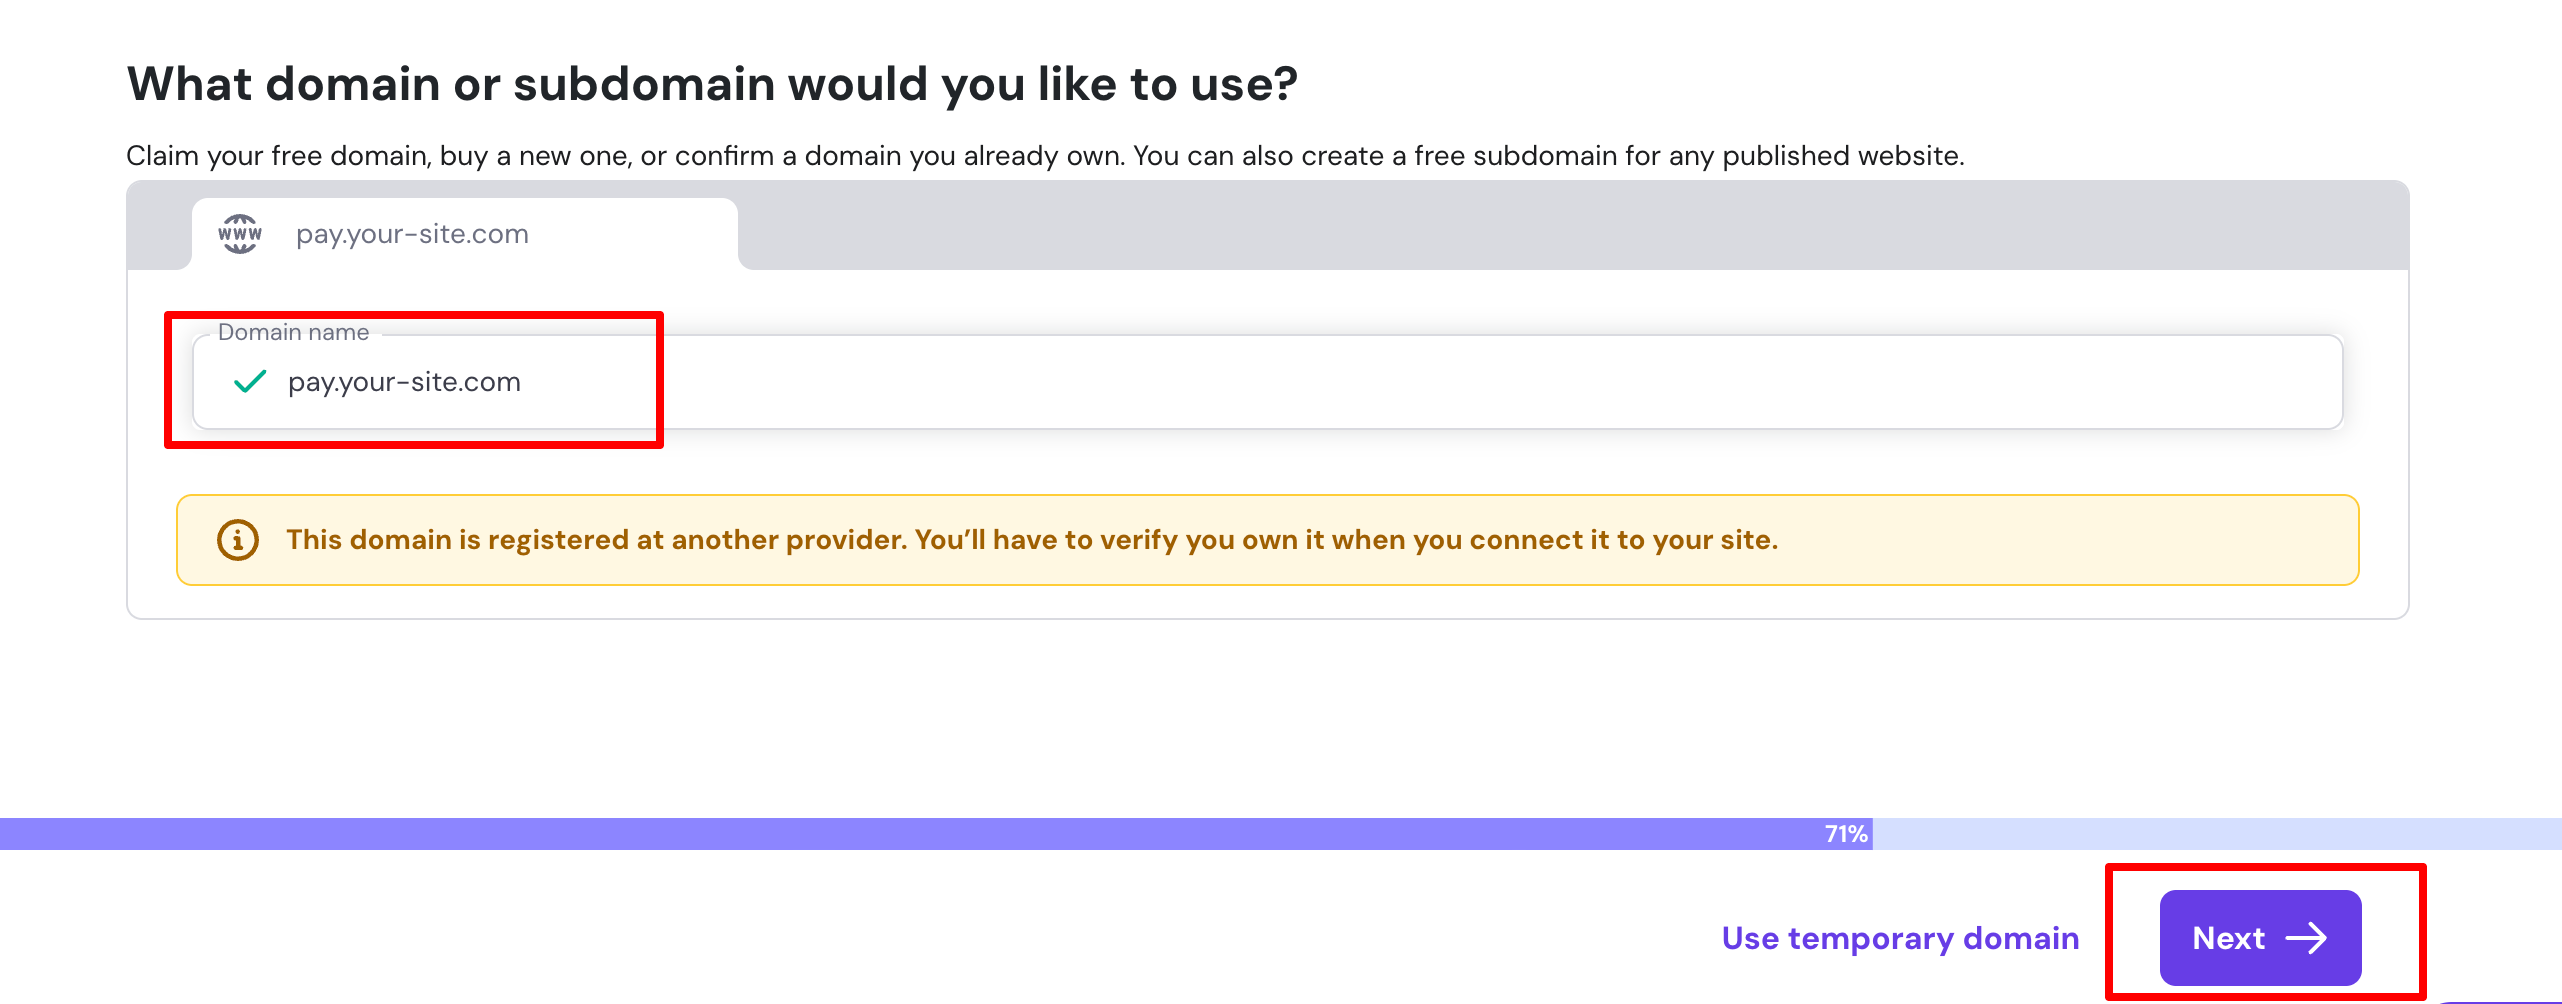
- Click the Next button to create the subdomain
Verify Subdomain Creation
After creation, your subdomain appears in the websites list. You can now proceed to configure PHP settings.
Subdomain Naming Best Practices
Recommended subdomain names:
- ✅
pay.yourdomain.com - ✅
payment.yourdomain.com - ✅
gateway.yourdomain.com
Avoid:
- ❌ Complex or random names
- ❌ Test-related names in production
- ❌ Names that are hard to remember
Step 2: Configure PHP Settings
Configure PHP version and enable required extensions for UddoktaPay.
Access PHP Configuration
- From your website dashboard, use the search bar and type "PHP"
- Click PHP Configuration from the Advanced section
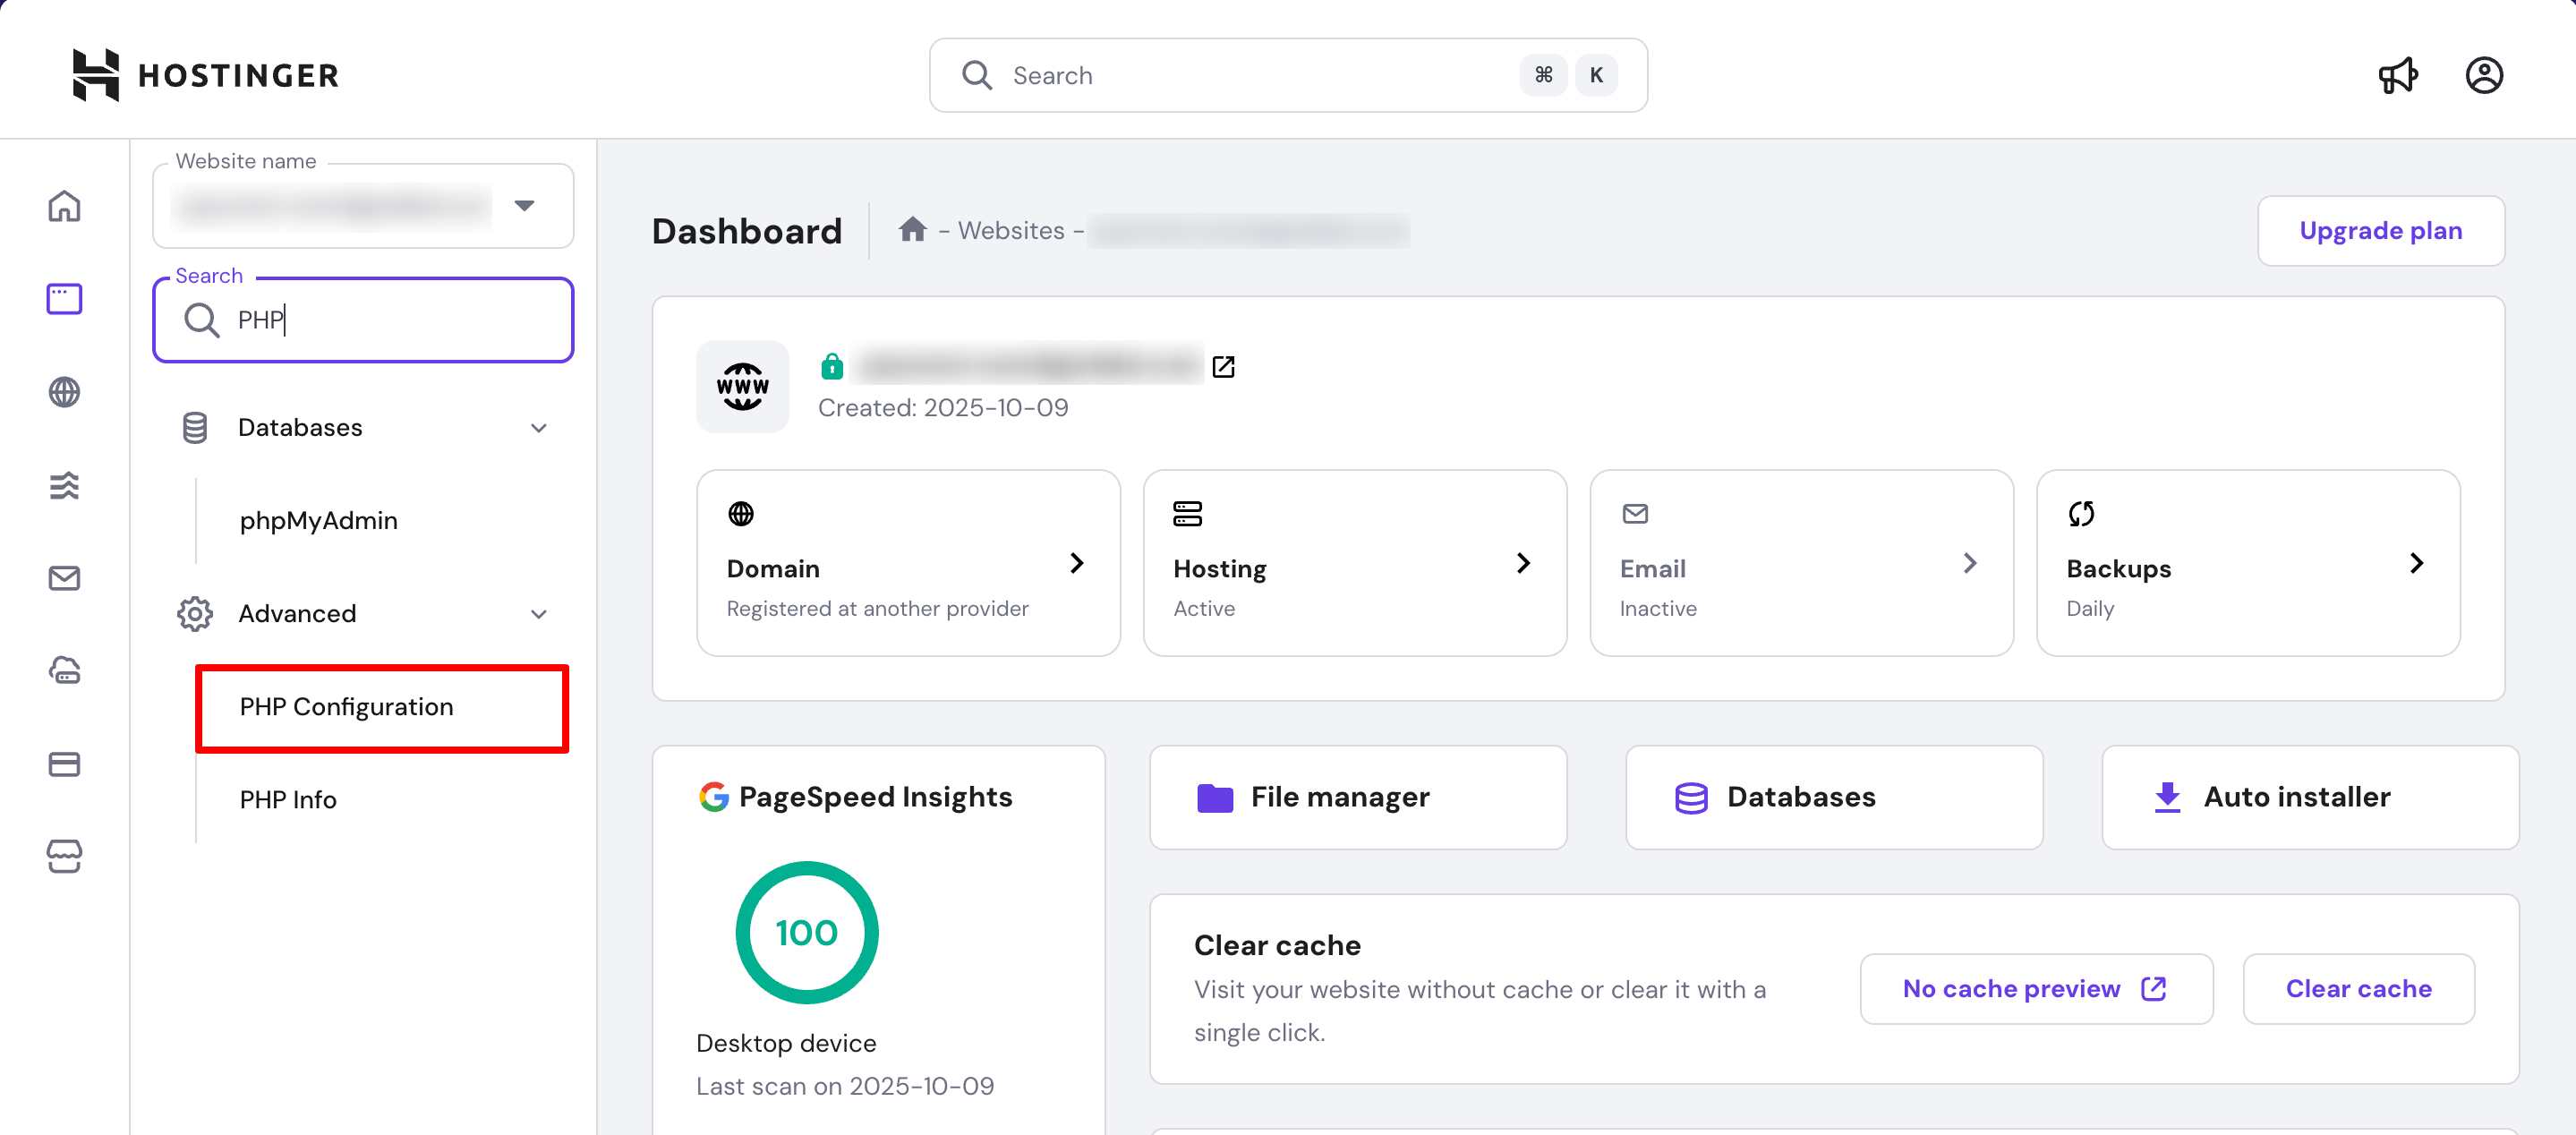
Alternative: Navigate to Advanced section in the left sidebar and click PHP Configuration.
Select PHP Version
- In the PHP Configuration page, locate the PHP version dropdown
- Select PHP 8.3 (or the highest available version ≥ 8.2)
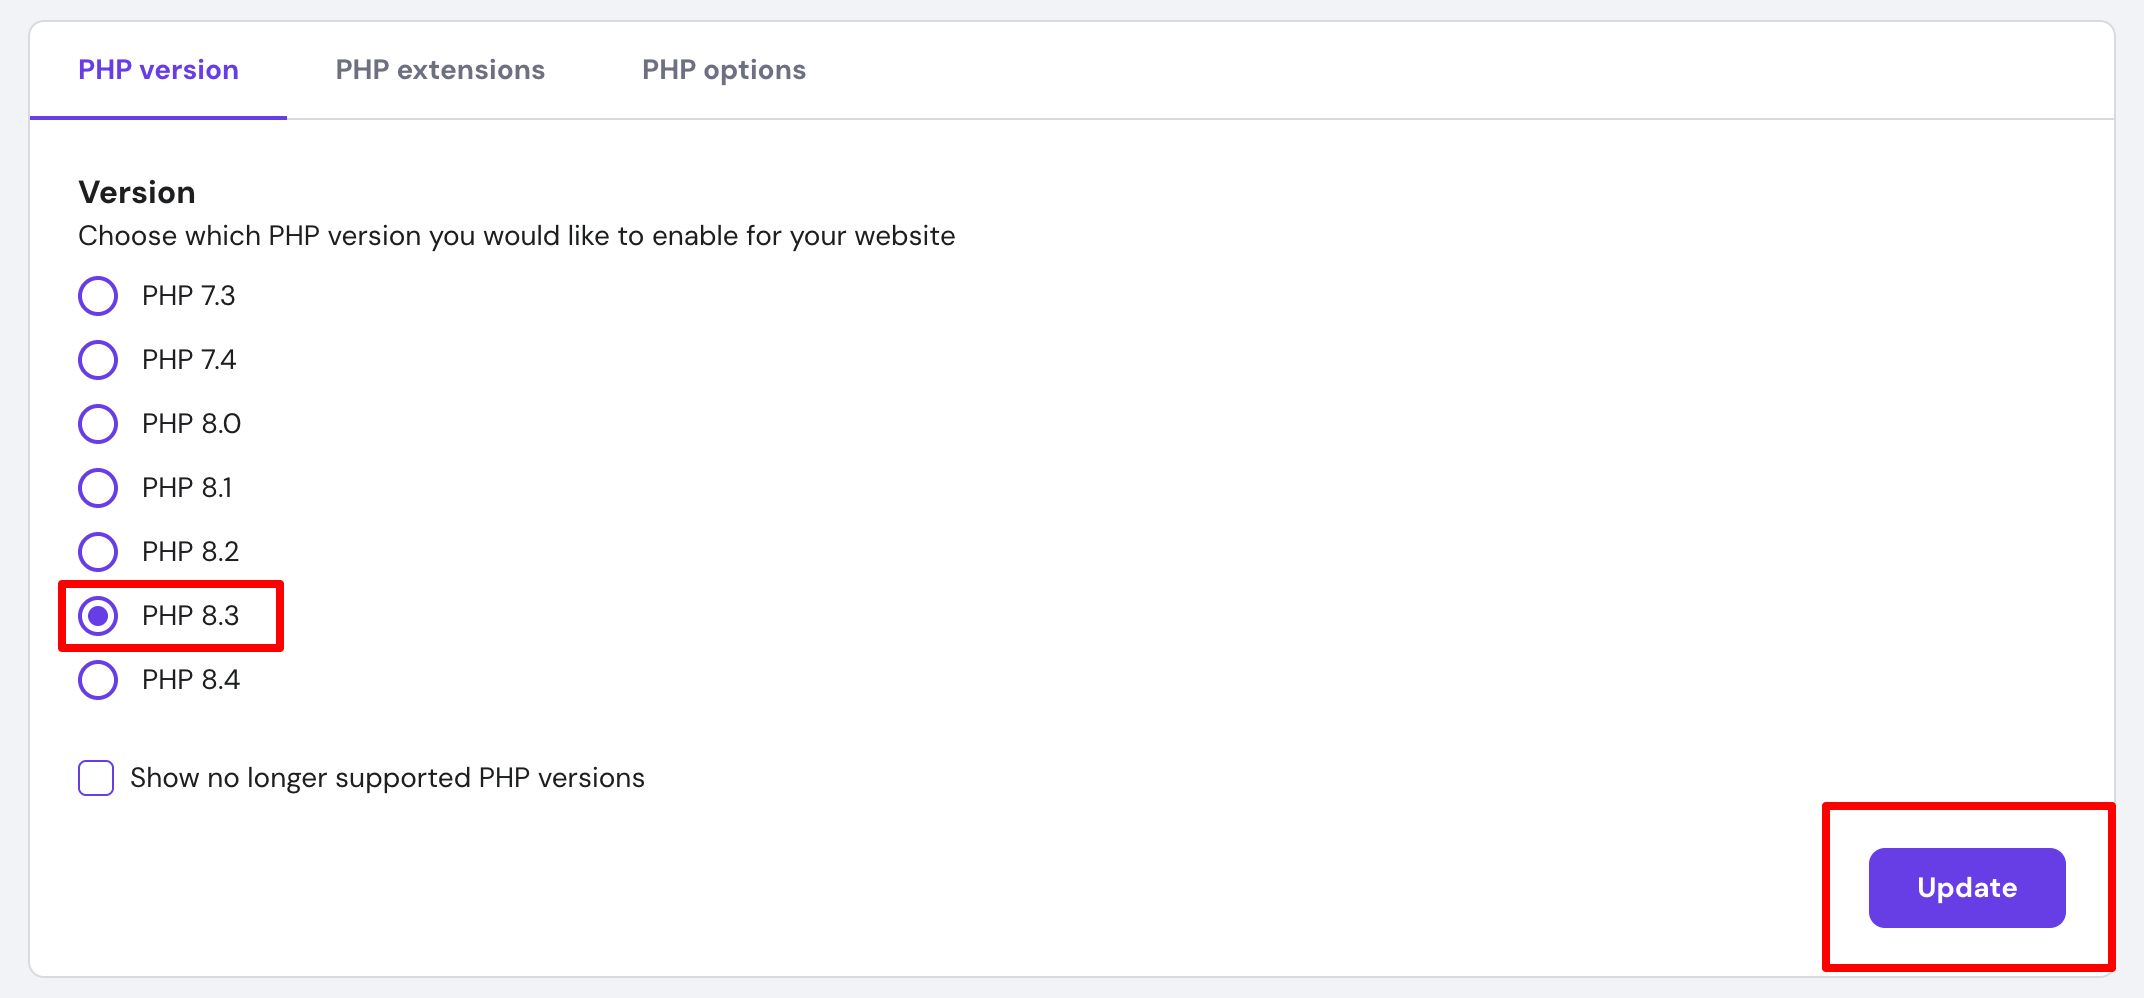
- Click the Update button to apply the changes
PHP Version Requirement
UddoktaPay requires PHP 8.2 or higher. Using older PHP versions will cause installation to fail.
Enable PHP Extensions
- Click on the PHP extensions tab at the top
- Locate and enable the following required extensions by checking their boxes:
Required Extensions:
- ✅
bcmath— Mathematical operations - ✅
mbstring— Multibyte string handling - ✅
ioncube_loader— IonCube encryption support (critical) - ✅
dom— DOM manipulation - ✅
fileinfo— File information detection - ✅
gd— Image processing - ✅
imagick— Advanced image manipulation - ✅
intl— Internationalization functions - ✅
mysqliorpdo_mysql— MySQL database connectivity - ✅
openssl— SSL/TLS cryptography - ✅
tokenizer— PHP tokenizer

- After selecting all required extensions, the changes save automatically
IonCube Loader Required
The ioncube_loader extension is absolutely required. UddoktaPay will not work without it. If you cannot enable it through hPanel, contact Hostinger support.
PHP configuration is now complete. Your server is ready for UddoktaPay installation.
Step 3: Upload Installer File
Transfer the UddoktaPay installer package to your subdomain directory.
Access File Manager
- Use the search bar in hPanel and type "File"
- Click File Manager from the Files section

Select Website Files
On the File Manager page, you'll see two options:
- Access files of [your-subdomain] ← Select this
- Access all files of Business Web Hosting

Click Access files of your subdomain to open the file browser for your specific website.
Navigate to Public Directory
- The file browser opens showing your website's root directory
- Double-click the public_html folder to open it
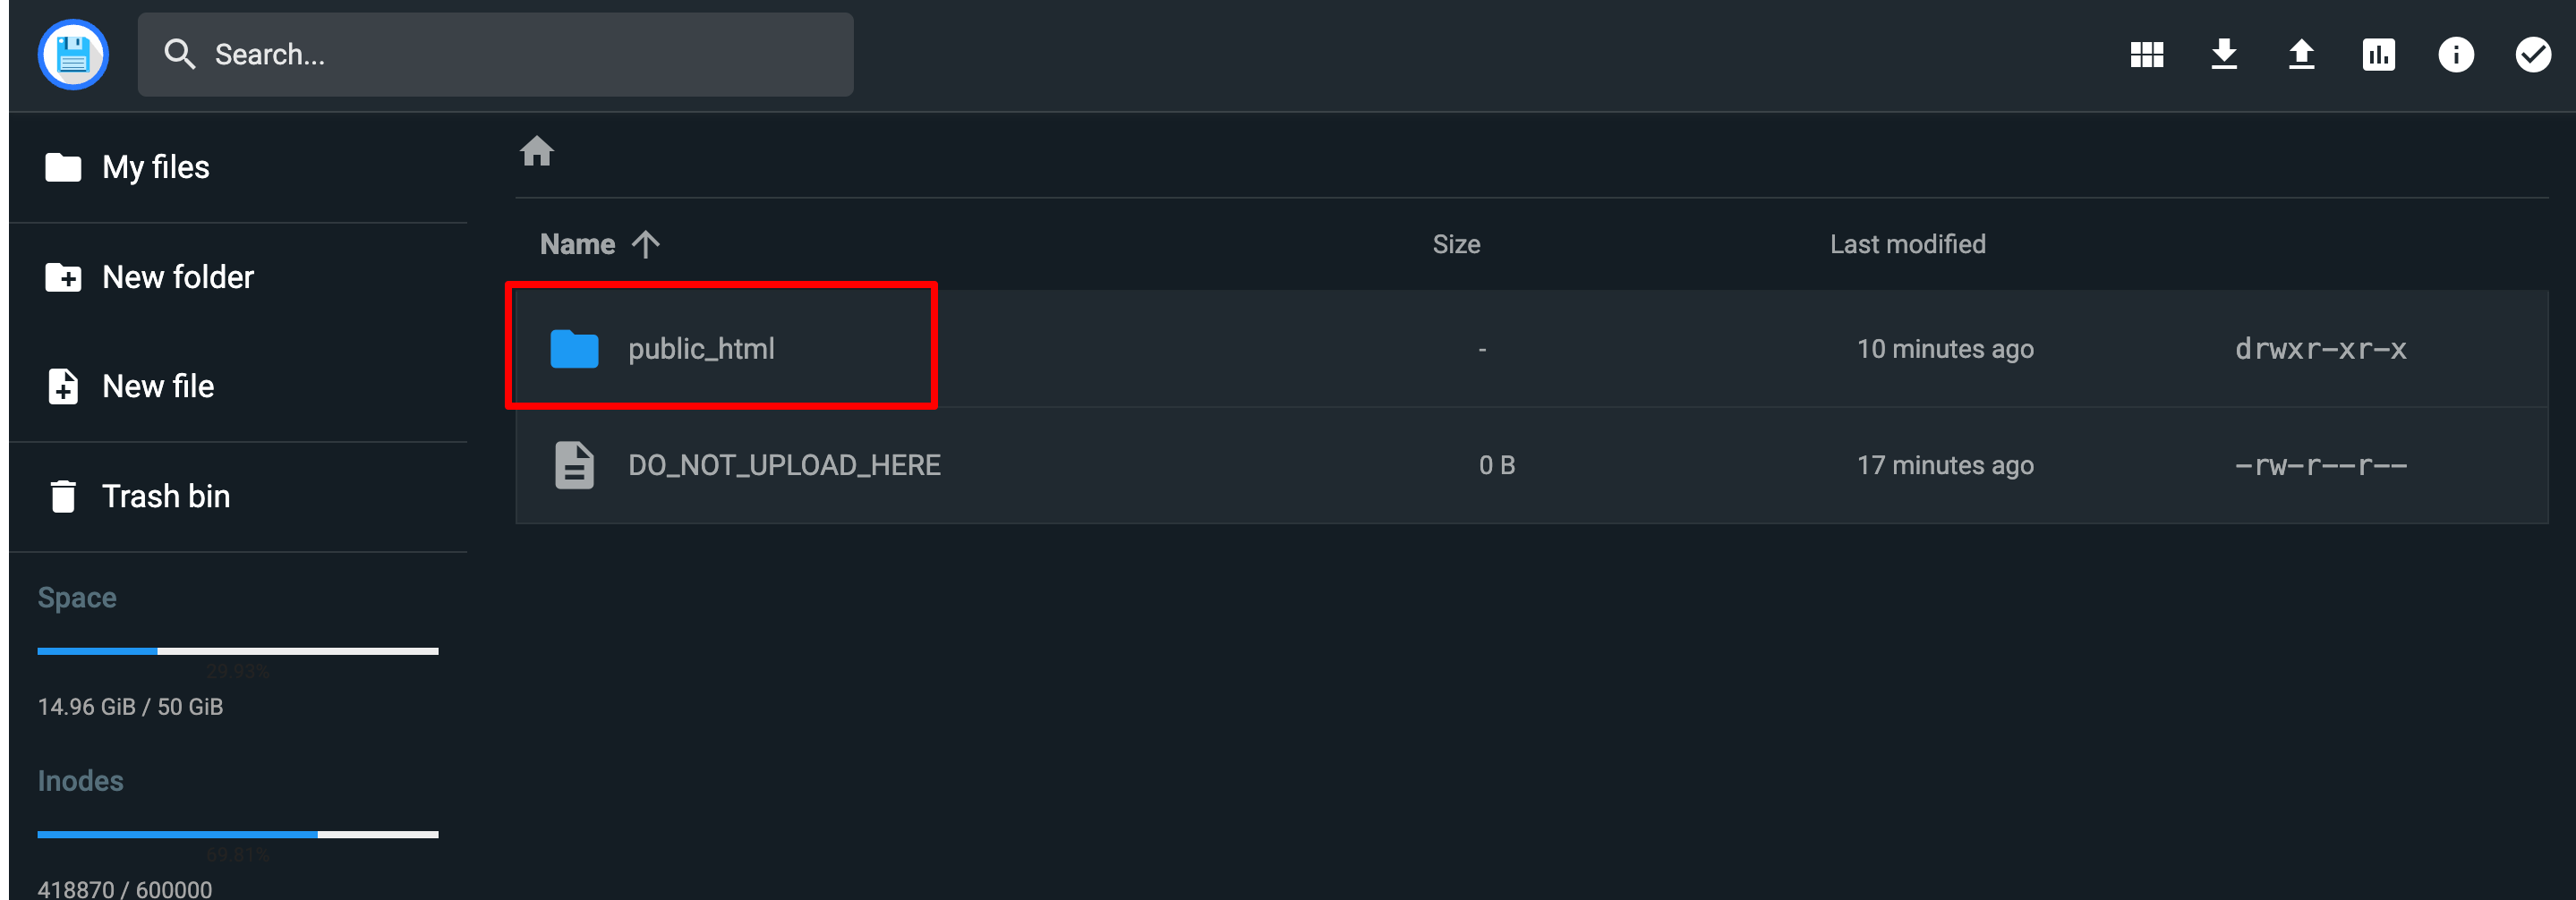
Document Root
The public_html folder is your website's document root. All publicly accessible files must be placed here or in its subdirectories.
Remove Default Files
By default, Hostinger places a sample file (default.php) in new installations:
- Select the
default.phpfile (if present) - Click the Delete icon (trash can) in the toolbar
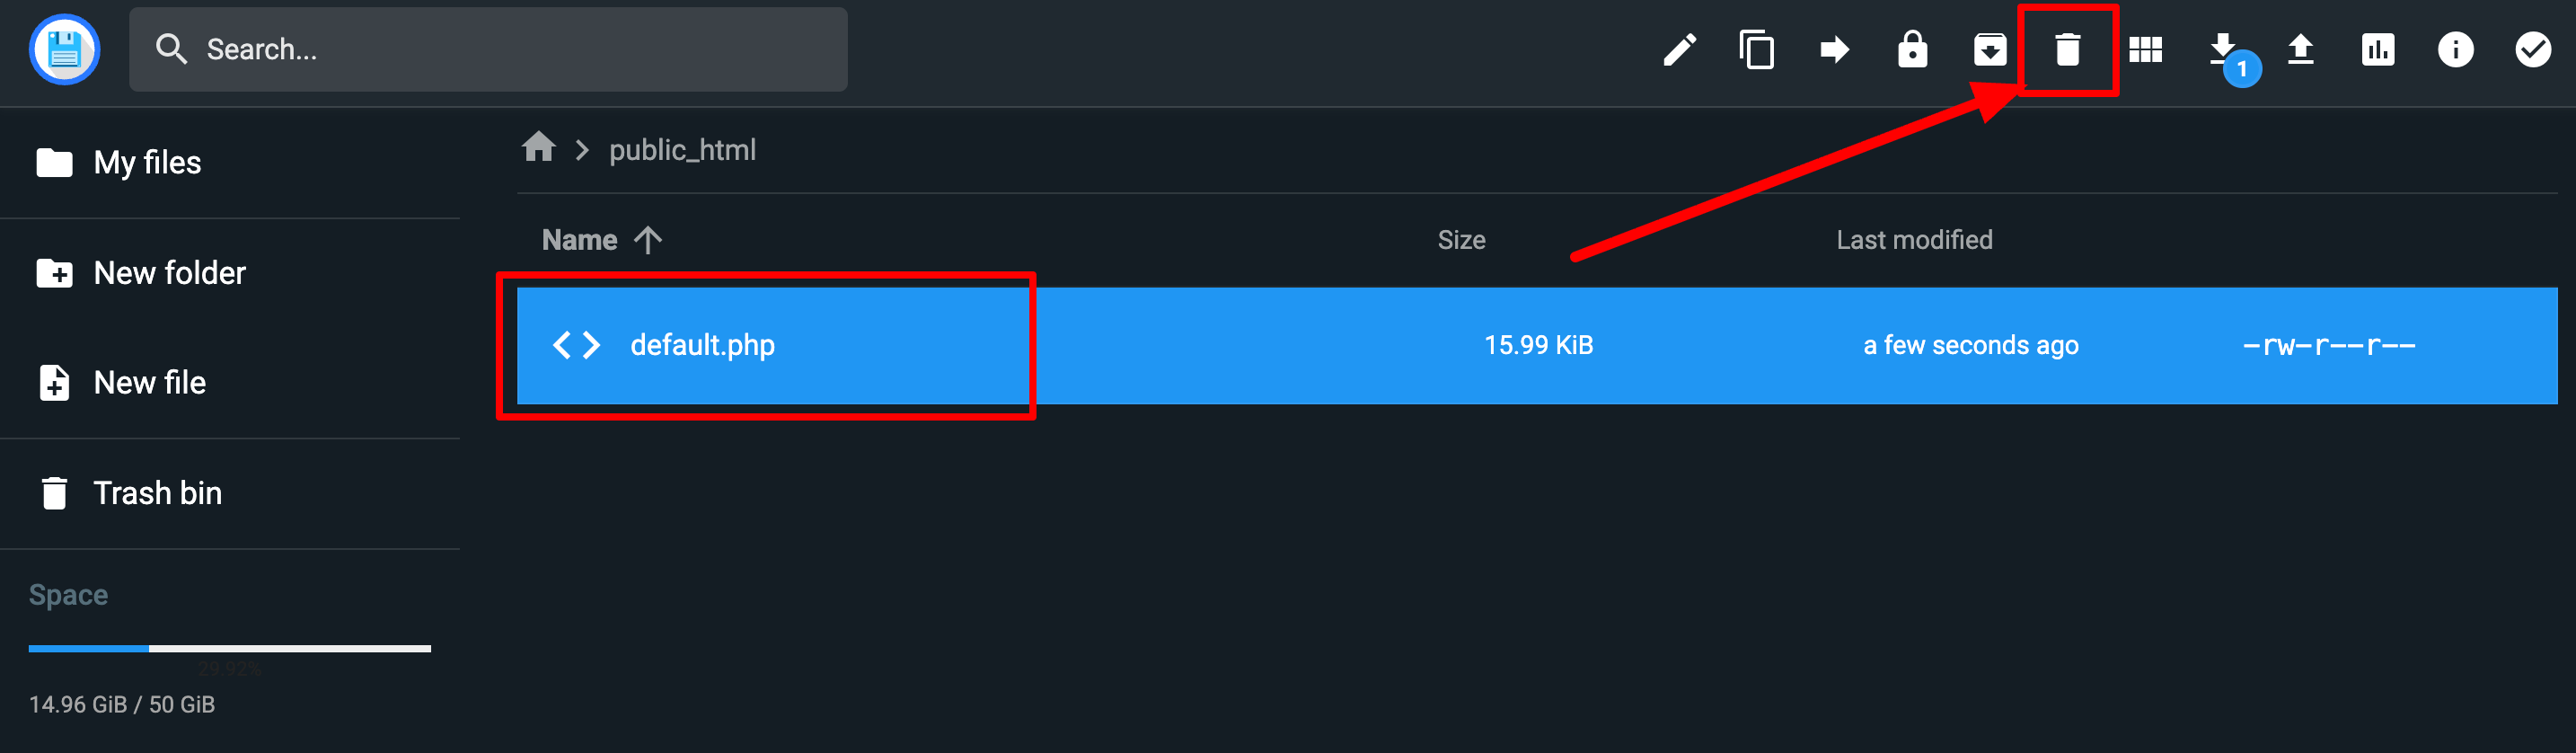
- Confirm deletion when prompted
Upload Installer Package
- Click the Upload button (cloud with up arrow icon) in the top toolbar
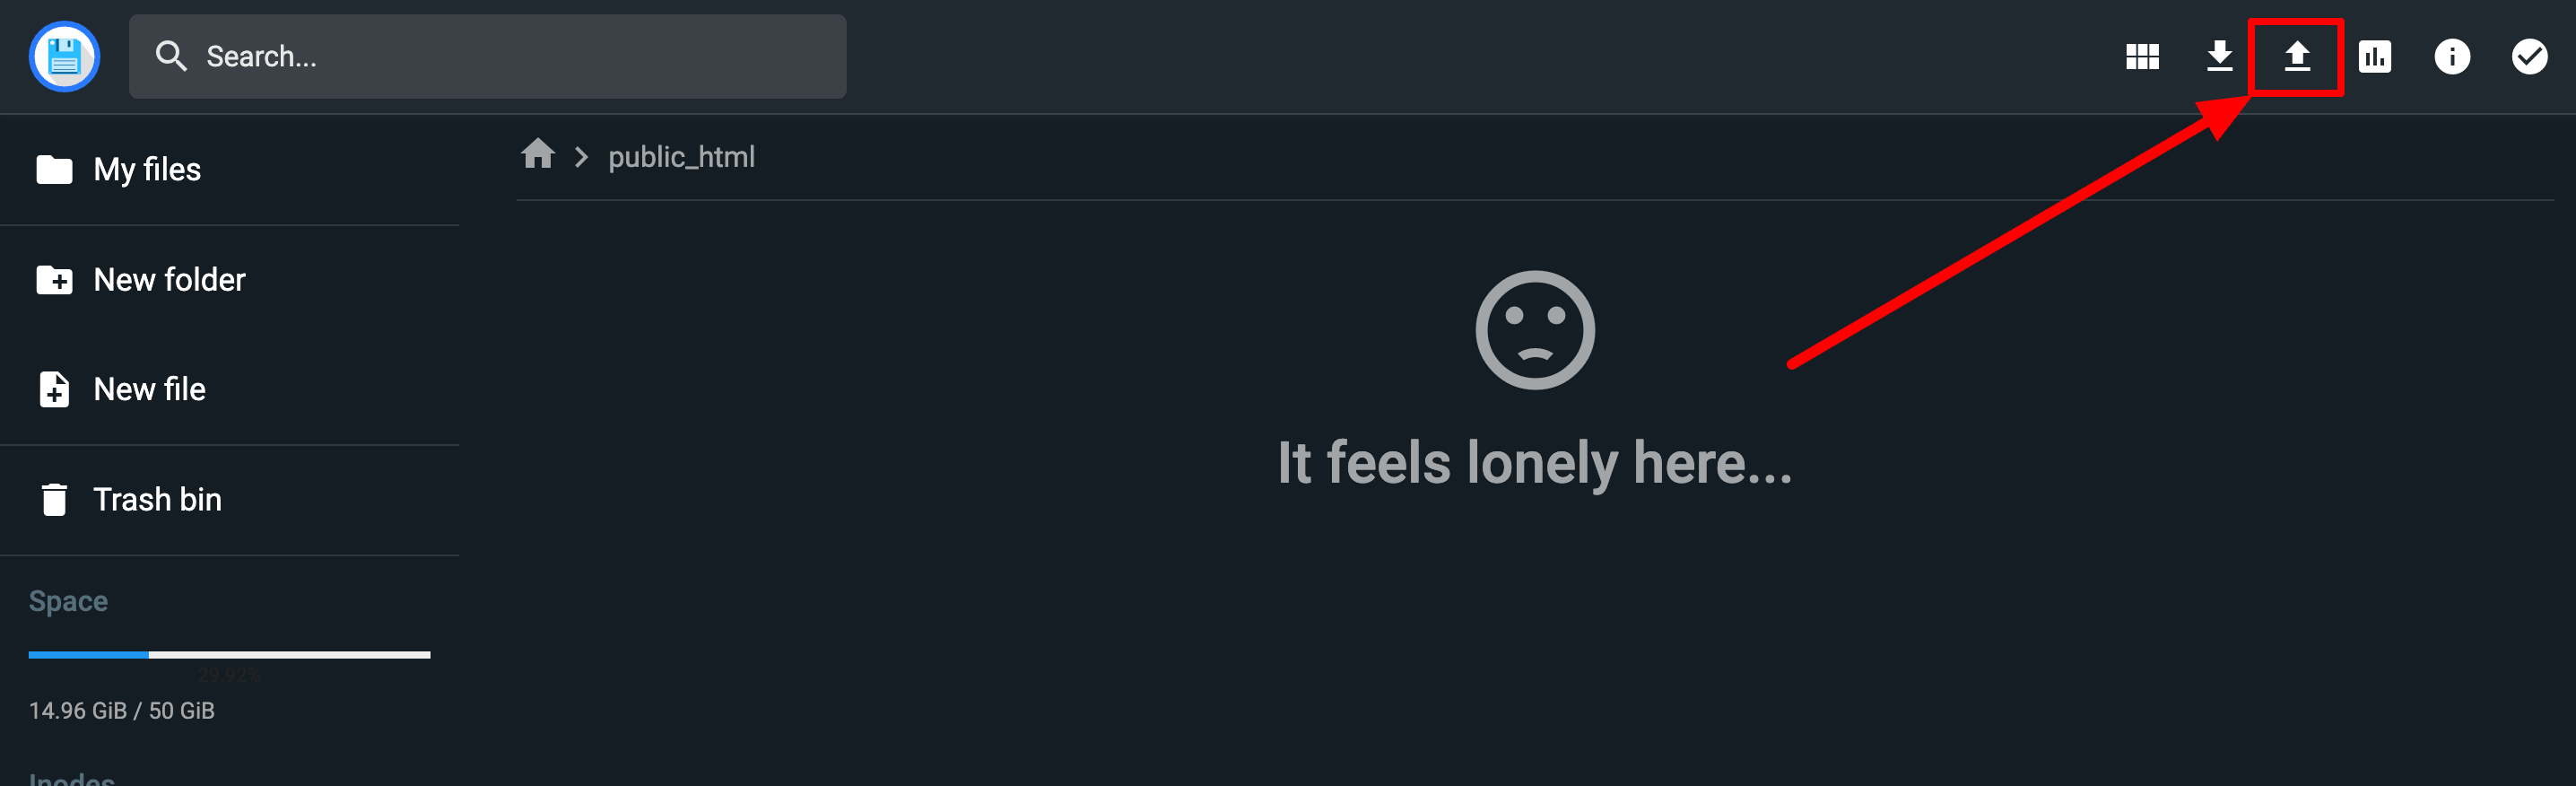
In the upload dialog:
- Drag and drop the
installer.zipfile - Or click to browse and select the file
- Drag and drop the
Wait for upload to complete (progress bar shows 100%)
After upload completes, you'll see the installer ZIP file in your
public_htmldirectory
Step 4: Extract Installer Files
Unzip the installer package in your public_html directory.
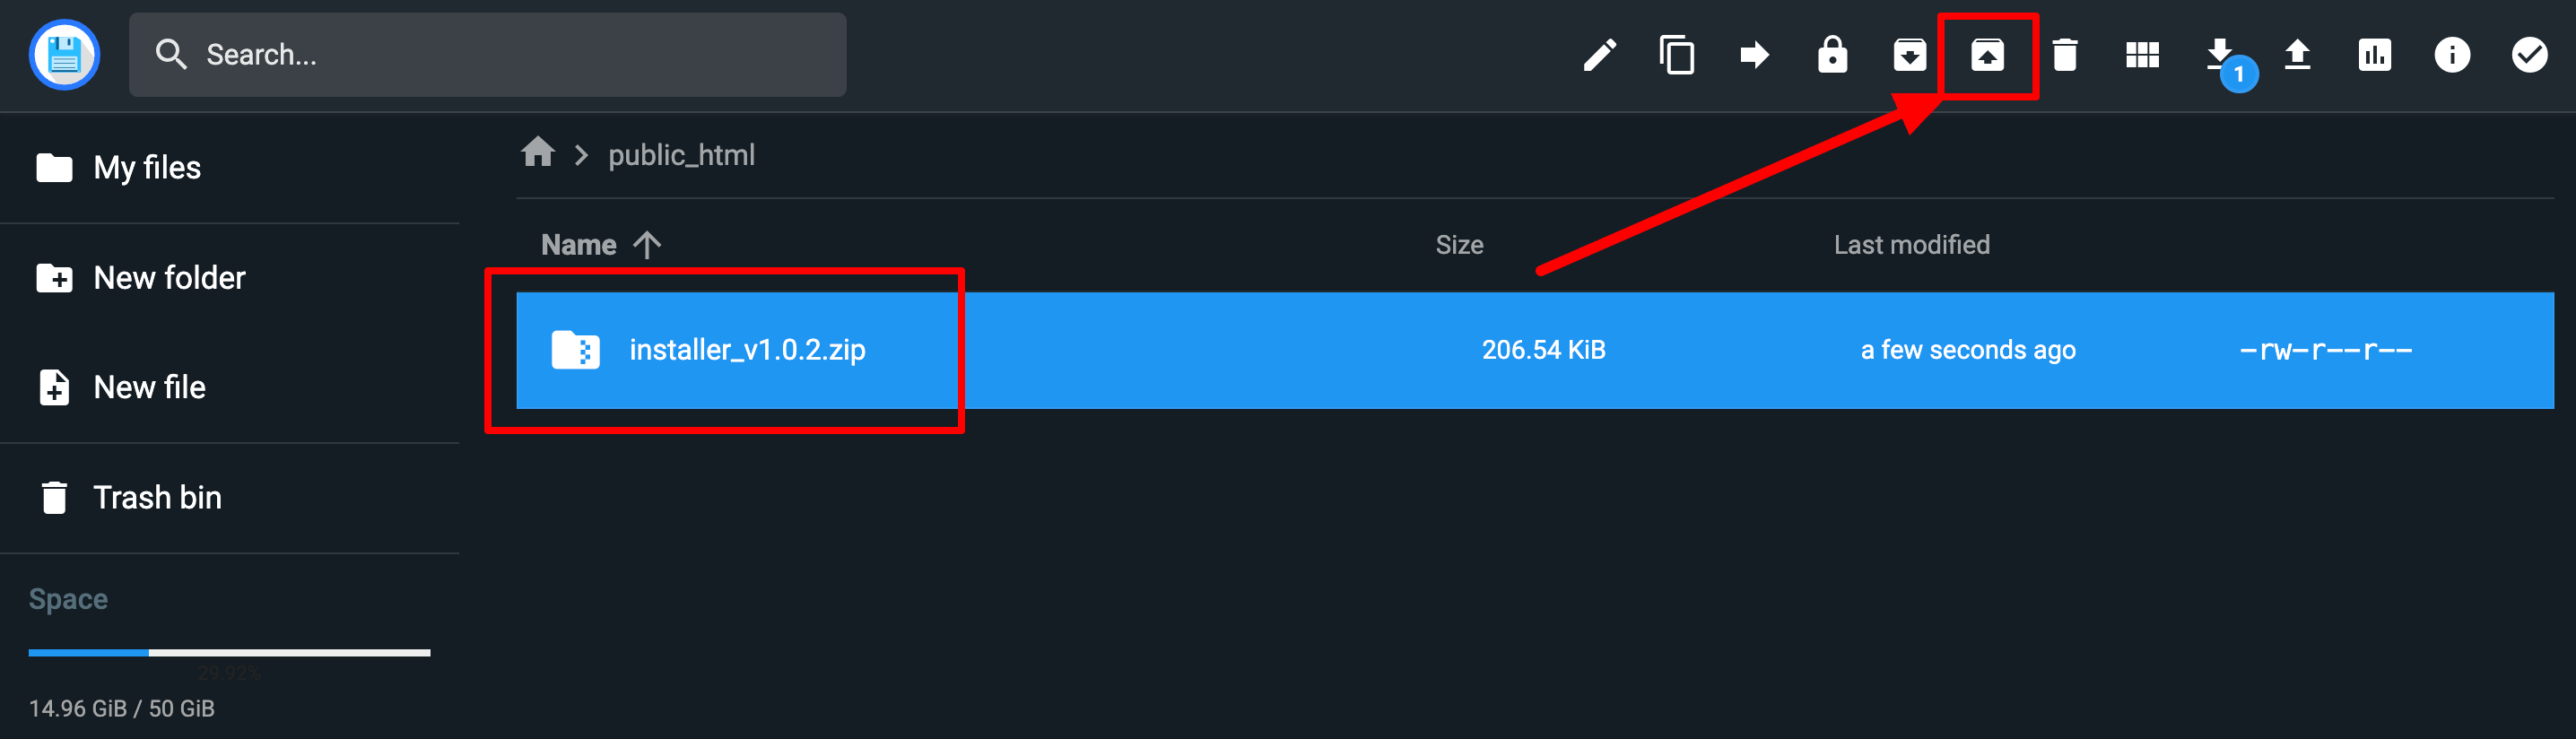
Extract ZIP File
- Click once on the
installer.zipfile to select it - Click the Extract icon (folder with zipper) in the toolbar
Configure Extract Location
- In the extract dialog, you'll see a text input field
- Enter a single dot
.in the field- This extracts files to the current directory (public_html)
- Do not leave it empty or change the path

Click the EXTRACT button to proceed
Wait for extraction to complete
Verify Extraction
After successful extraction, your public_html folder should contain:
publicfolder.htaccessfile- Other installation files and directories
- The original
installer.zipfile (can be deleted)
Clean Up
After verifying successful extraction, you can delete the ZIP file to save disk space. Select it and click the Delete icon.
Step 5: Create Database
Create a MySQL database using Hostinger's database management interface.
Access Database Management
- Use the search bar in hPanel and type "data"
- Click Management under the Databases section
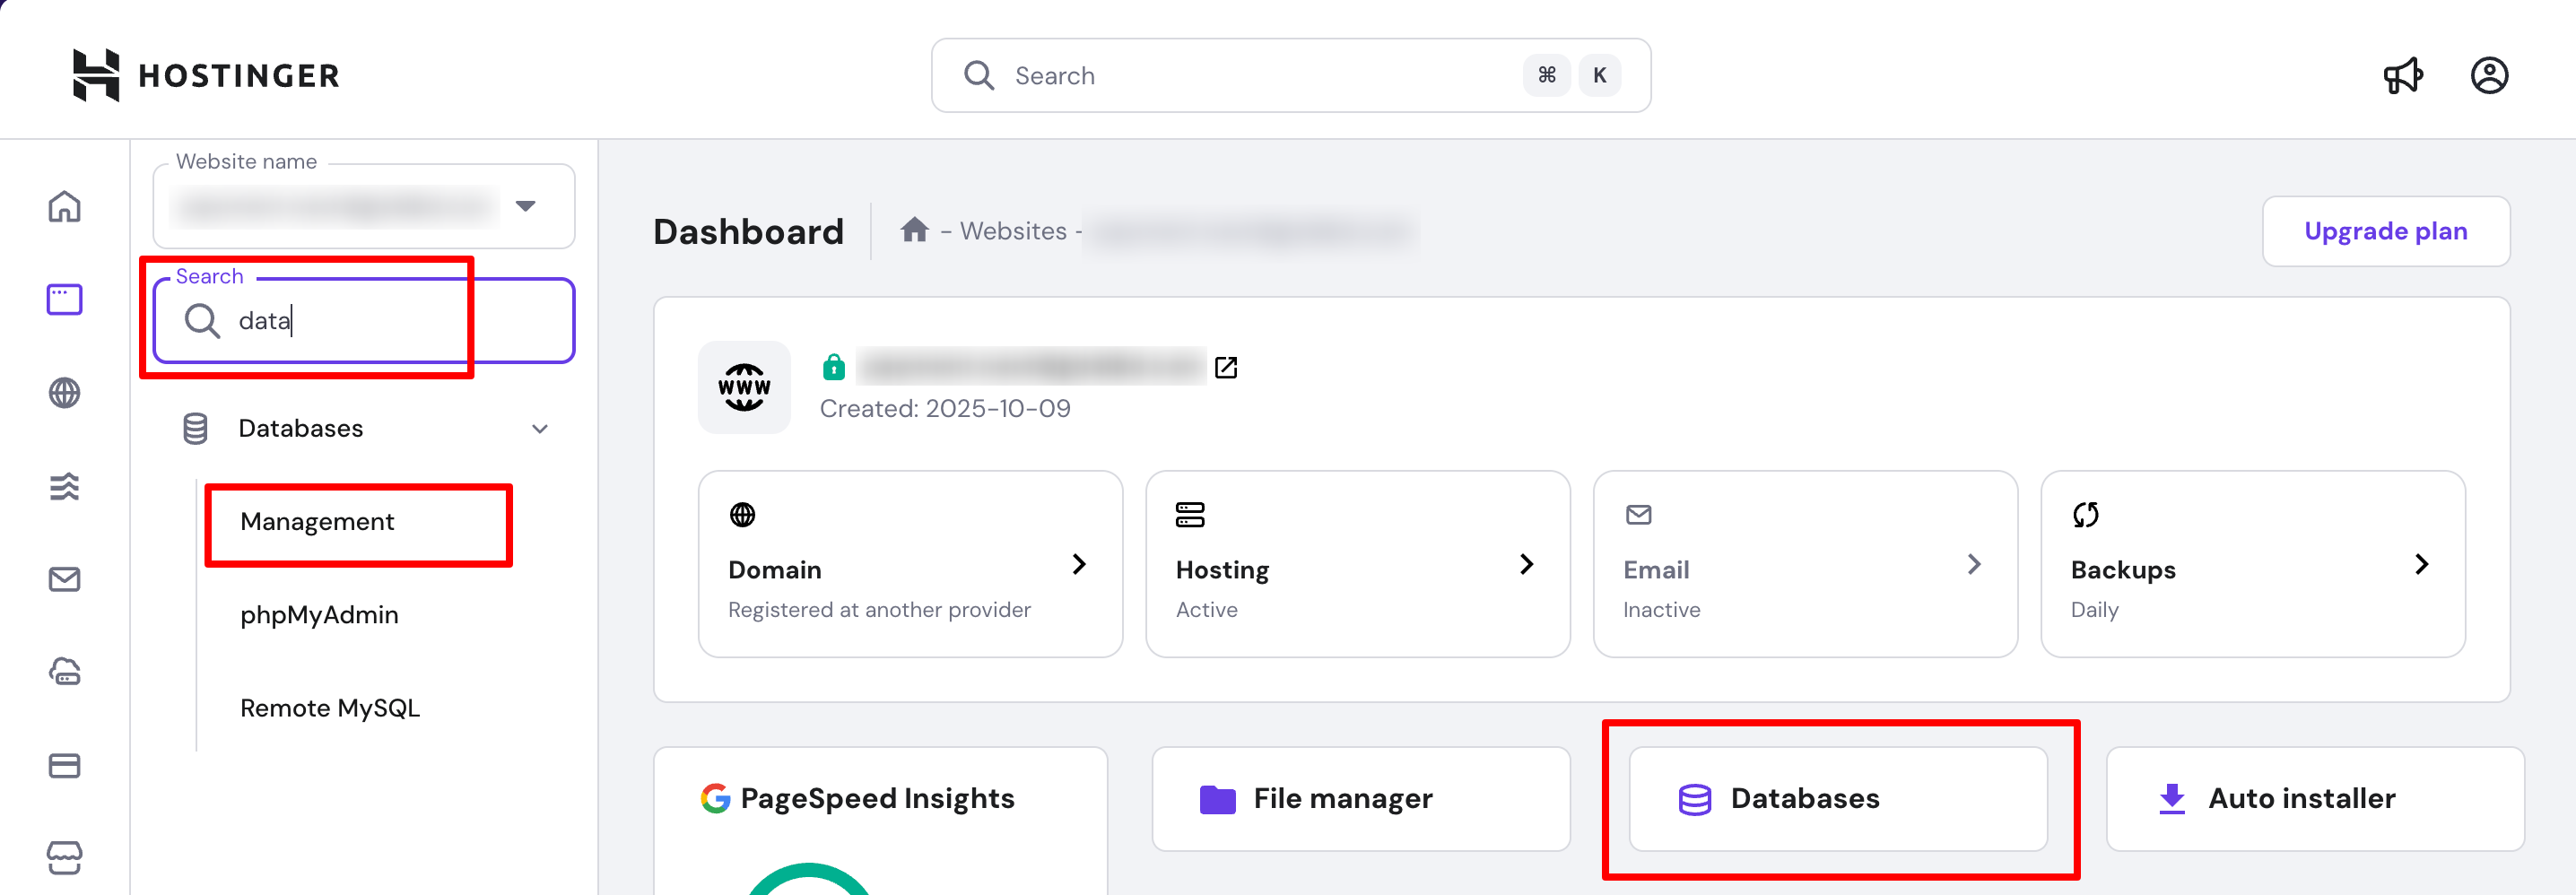
Database Information:
- Database Name — Usually in format
u304694960_dbname - Username — Usually matches database name
u304694960_username - Password — Hidden by default (click eye icon to reveal)
- Hostname — Usually
localhostor127.0.0.1 - Port — Default
3306
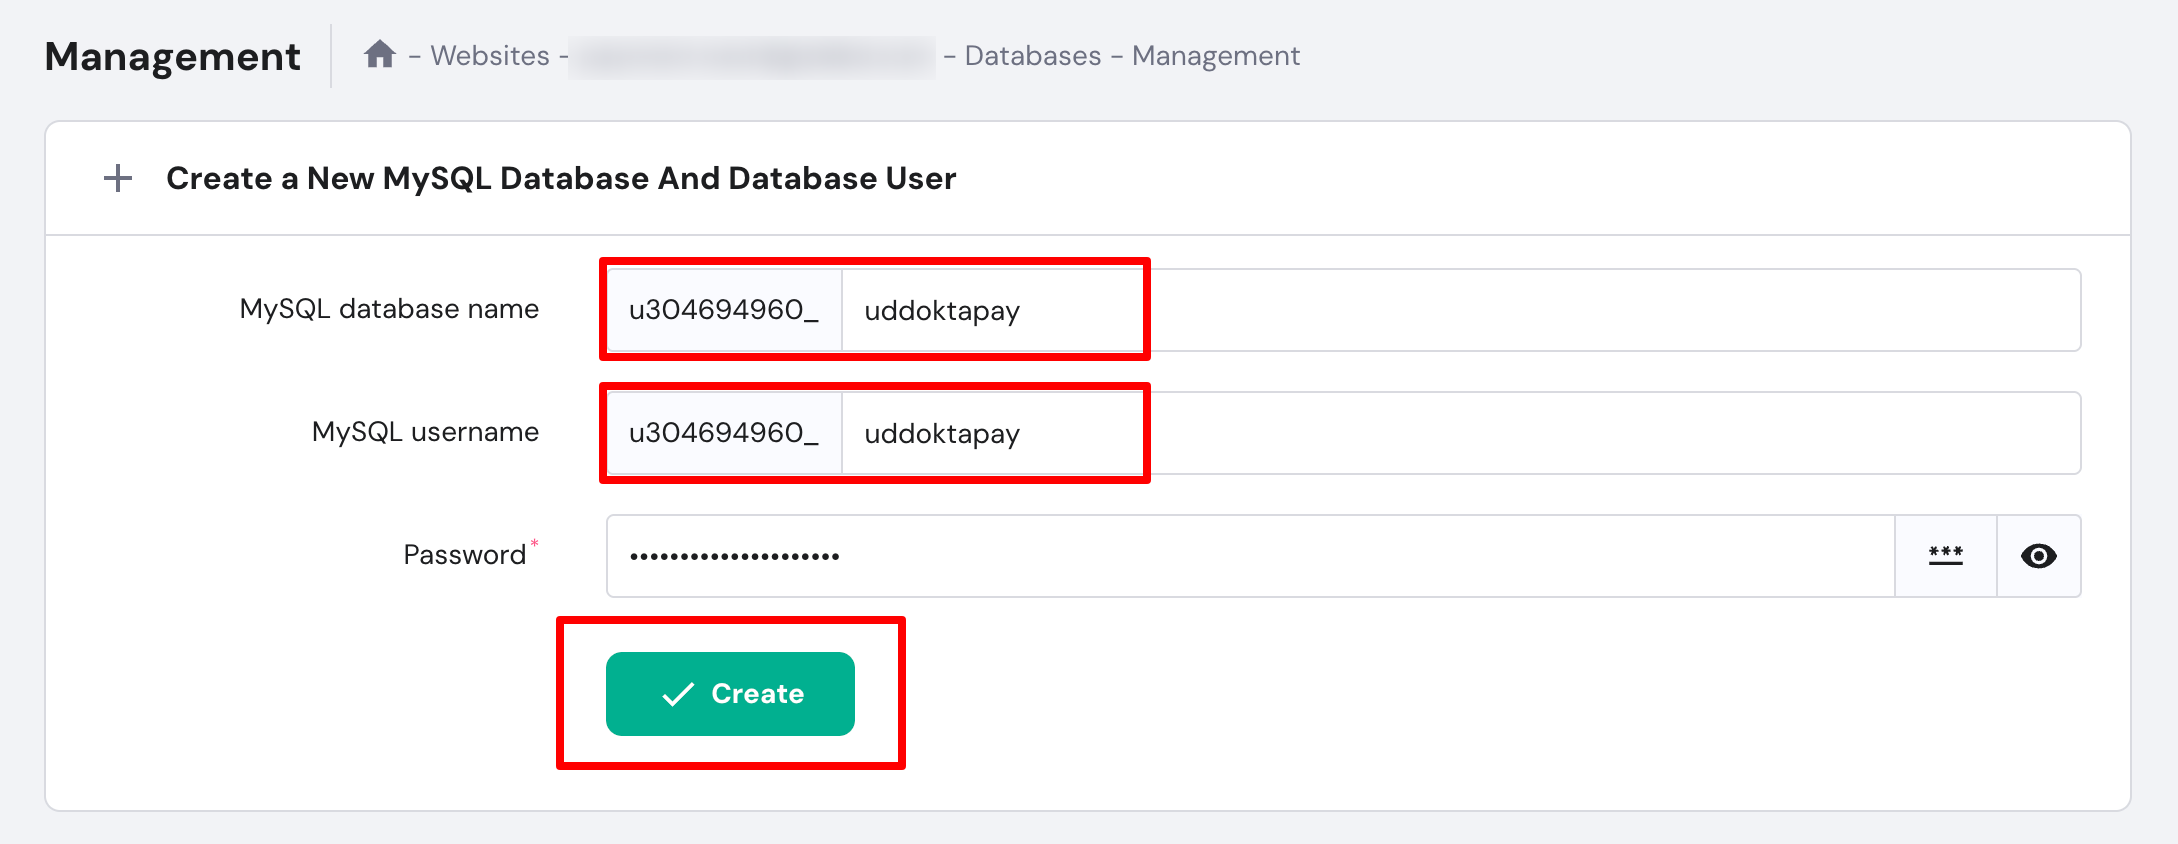
Record Database Credentials
Critical: Write down or securely save these credentials immediately:
- Complete database name (including prefix)
- Complete username (including prefix)
- Password (click eye icon to view)
- Hostname
- Port number
You'll need these exact credentials in the next step. Hostinger does not allow you to retrieve the password later.
Database Credentials Format
Your database credentials will look like this:
| Credential | Format | Example |
|---|---|---|
| Host | localhost or 127.0.0.1 | 127.0.0.1 |
| Port | 3306 | 3306 |
| Database Name | u304694960_uddoktapay | u304694960_uddoktapay |
| Username | u304694960_uddoktapay | u304694960_uddoktapay |
| Password | Your database password | ●●●●●●●●●● |
Password Security
If you want to change the database password for better security:
- Click the Reset password option
- Generate a strong password
- Save the new password securely
- Use the new password during installation
Database is ready. Keep these credentials available for the next step.
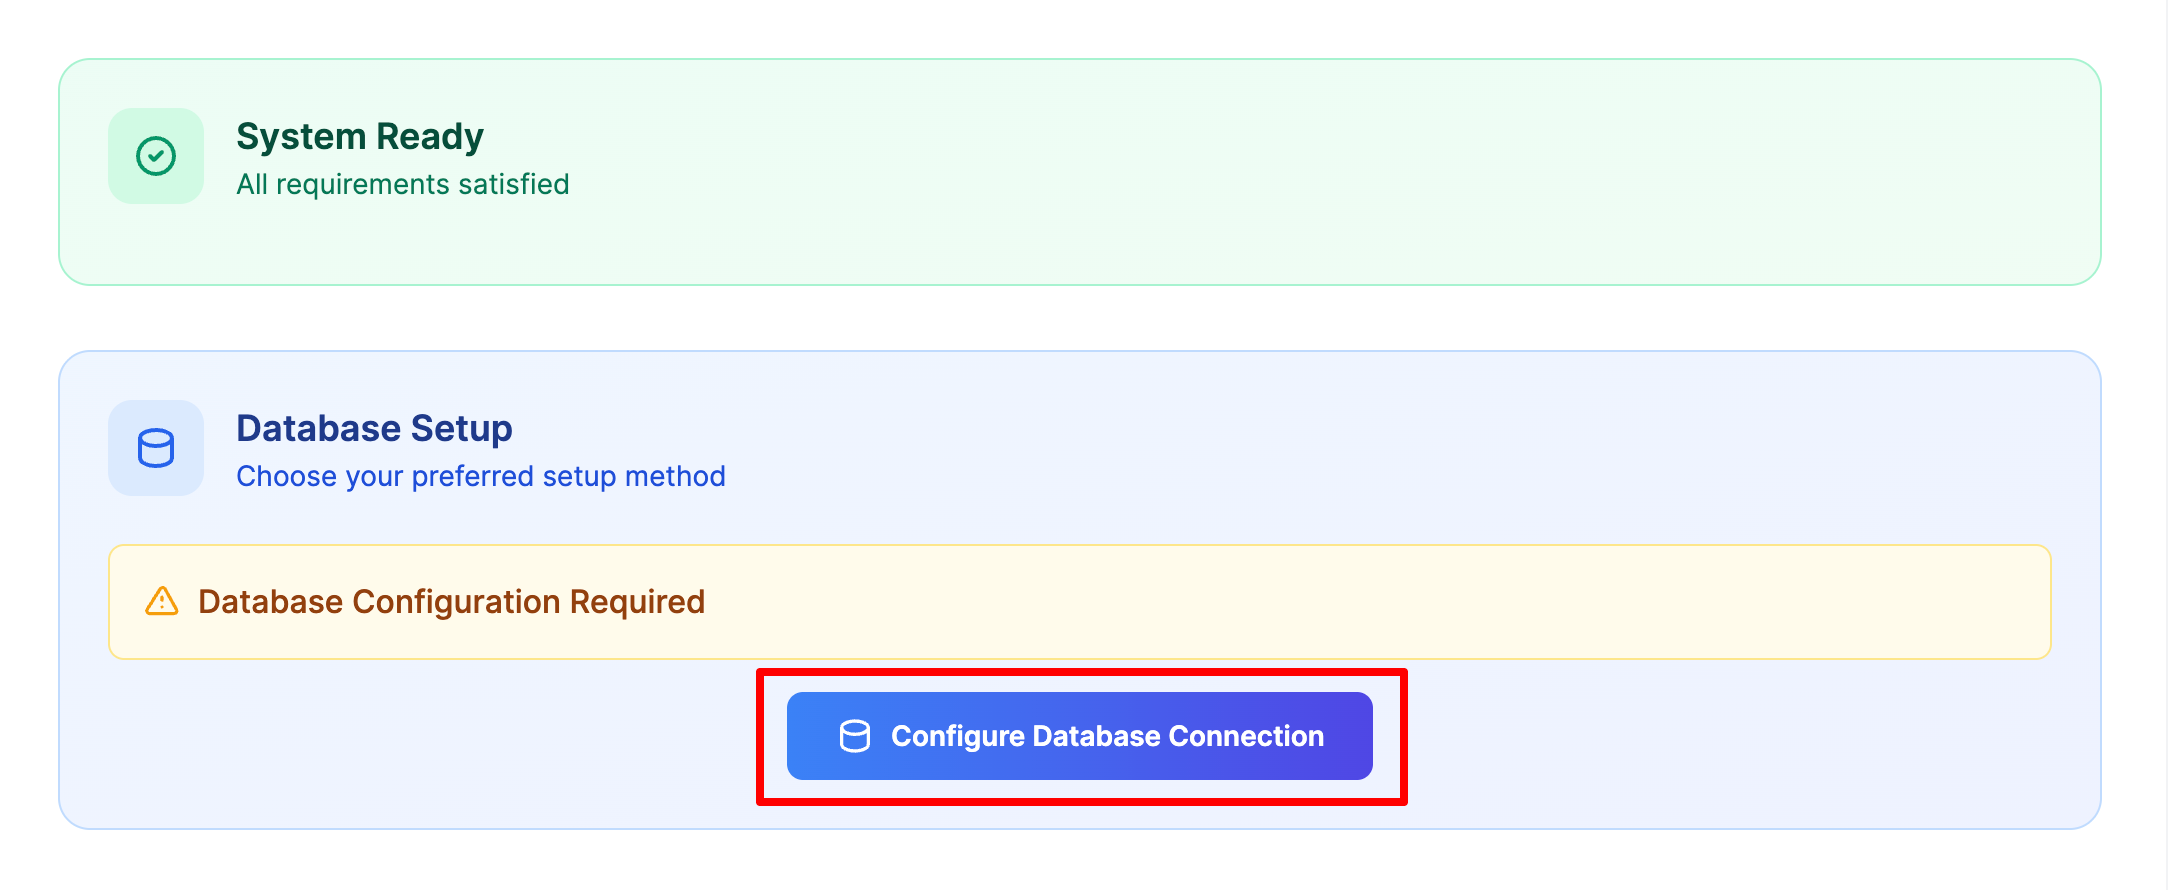
Step 6: Configure Database Connection
Access the UddoktaPay installer and connect to your database.
Access Installer Interface
- Open your web browser
- Navigate to your subdomain URL (e.g.,
https://pay.yourdomain.com) - The installer loads automatically
Verify System Requirements
The installer automatically checks your server environment and displays the results.
If you see "System Ready - All requirements satisfied":
- ✅ Proceed to database configuration
- All PHP extensions are properly installed
If you see warnings about missing PHP extensions:
- Return to Step 2: Configure PHP Settings
- Enable the missing extensions
- Refresh the installer page
Common Missing Extensions
Most frequently missing extensions on Hostinger:
- IonCube Loader (required)
- mbstring
- pdo_mysql or mysqli
- openssl
- tokenizer
If you cannot enable these through hPanel, contact Hostinger support.
Start Database Configuration
- Click Configure Database Connection button
Select Database Driver
- In the database configuration form, select MySQL as the Database Driver
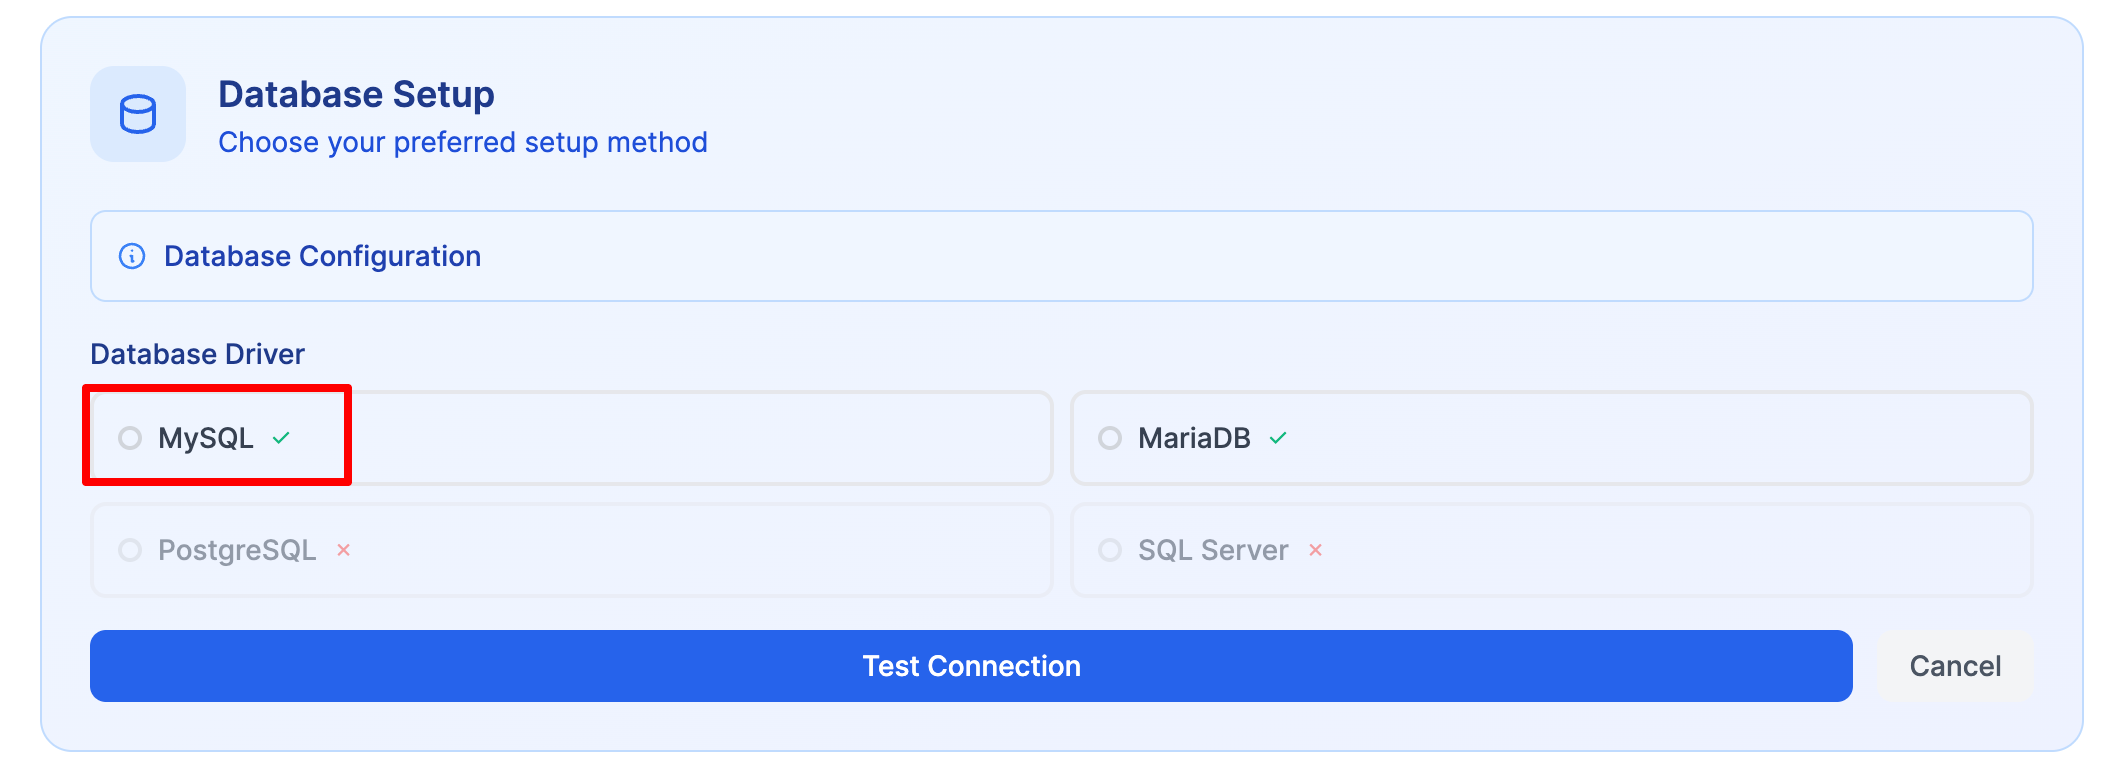
Enter Database Credentials
Fill in your database credentials from Step 5:
| Field | Value | Example |
|---|---|---|
| Database Driver | MySQL | MySQL (selected) |
| Host | From database page | 127.0.0.1 |
| Port | Usually 3306 | 3306 |
| Database Name | Full name with prefix | u304694960_uddoktapay |
| Username | Full username with prefix | u304694960_uddoktapay |
| Password | Your database password | Your actual password |

Test Database Connection
- After entering all credentials, click Test Connection button
- Wait for the connection test to complete
Successful Connection:
- ✅ Green success message appears
- ✅ "Connection successful" or similar confirmation
- ✅ Proceed to next step button becomes available
Connection Failed:
Common issues and solutions:
| Error | Solution |
|---|---|
| Access denied | Double-check username and password (no extra spaces) |
| Unknown database | Verify database name includes correct prefix |
| Can't connect to server | Try changing host from localhost to 127.0.0.1 (or vice versa) |
| Connection timeout | Check if database service is running (contact Hostinger support) |
Hostname Variations
If connection fails with 127.0.0.1, try localhost. Some Hostinger servers require one specific format. The correct value is shown in your database management page from Step 5.
After successful connection test, proceed to create your admin account.
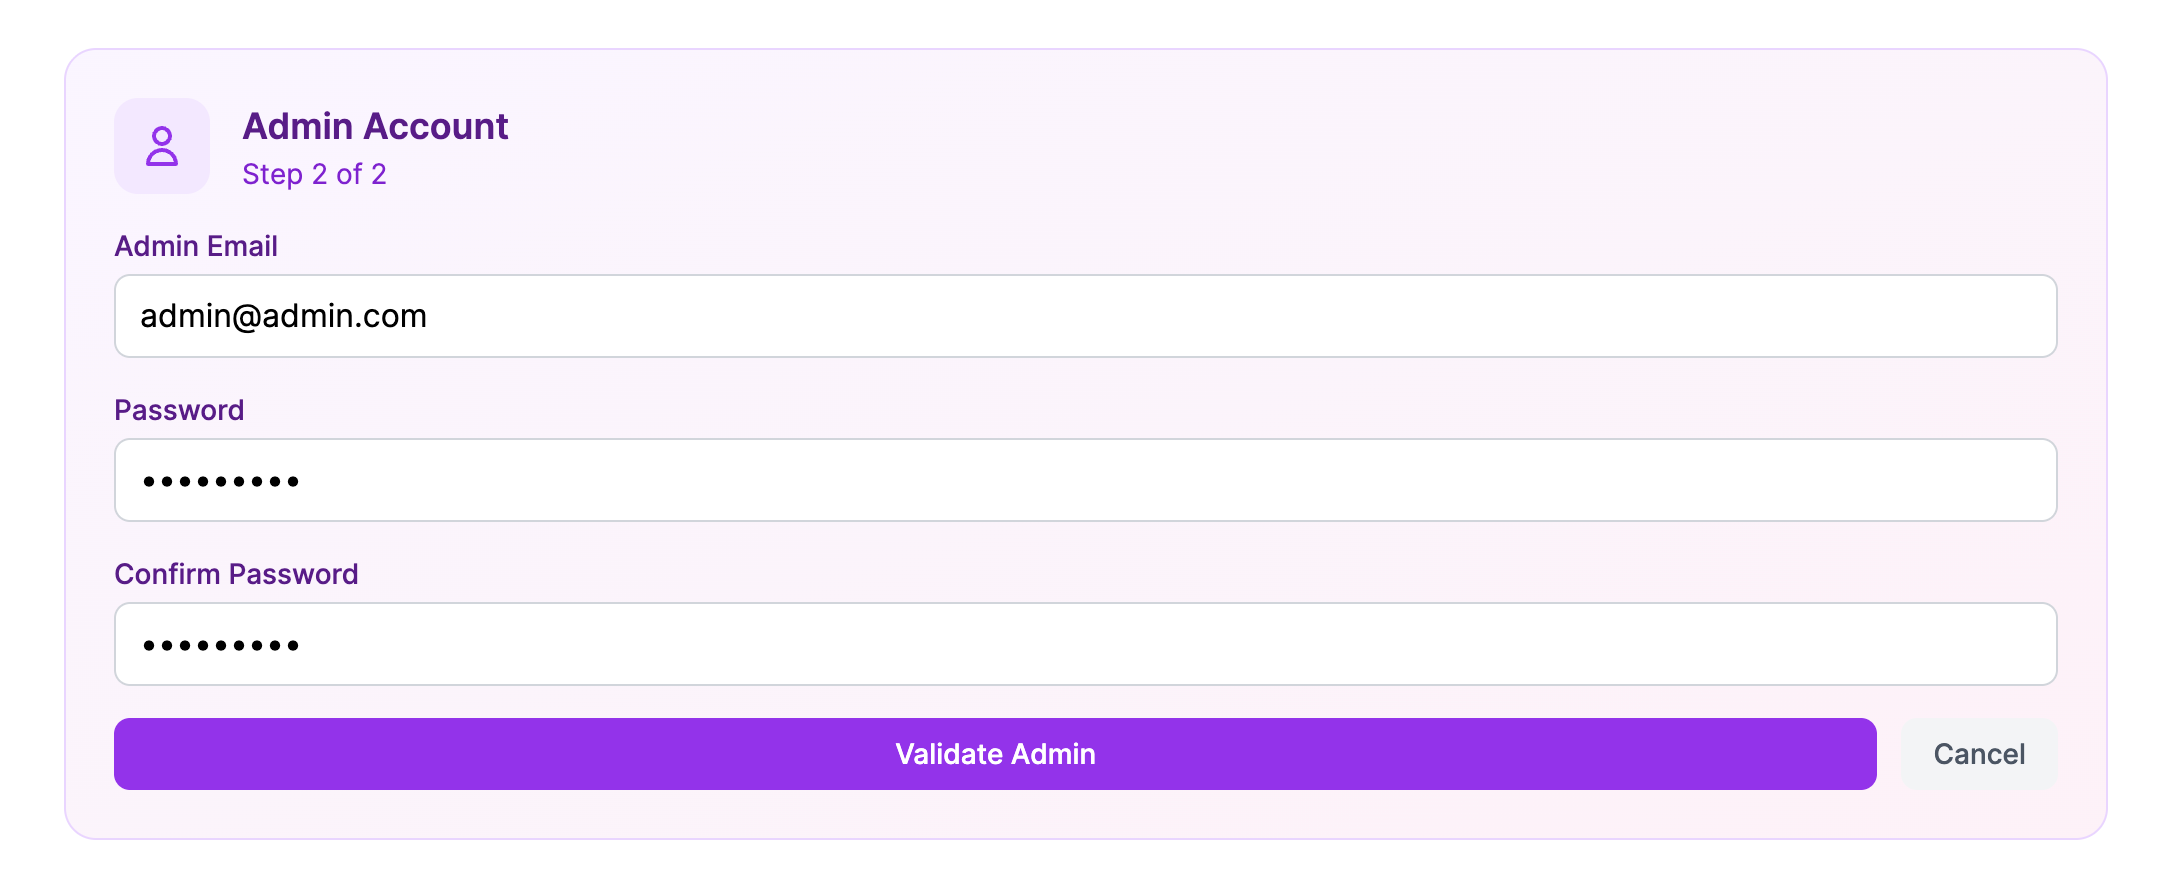
Step 7: Create Admin Account
Set up your administrator account to manage UddoktaPay.
Enter Admin Credentials
Fill in the admin account creation form with your details:
| Field | Description | Requirements |
|---|---|---|
| Admin Email | Your email address | Valid email format; used for login |
| Password | Administrator password | Minimum 12 characters recommended |
| Confirm Password | Repeat password | Must match password field exactly |
Create Strong Password
Password security requirements:
- ✅ Minimum 12 characters (longer is better)
- ✅ Mix of uppercase and lowercase letters
- ✅ Include numbers and special symbols
- ✅ Never reuse passwords from other services
- ✅ Avoid personal information (names, birthdates, phone numbers)
- ✅ Use a password manager to generate and securely store
Example of strong passwords:
- ✅
K9$mP3xR#nQ7@wL5 - ✅
Tr0p!c4l_P@radi$e_2025 - ❌
admin123(too weak) - ❌
YourName2025(too predictable)
Validate Admin Account
Double-check all information is correct
- Email address is spelled correctly
- Password meets strength requirements
- Confirmation password matches exactly
Click Validate Admin button to verify
System validates your entries and proceeds if successful
Critical Security Warning
This account has complete administrative access to your payment gateway. Use an extremely strong, unique password and enable two-factor authentication immediately after first login.
Never share these credentials or use them on other platforms.
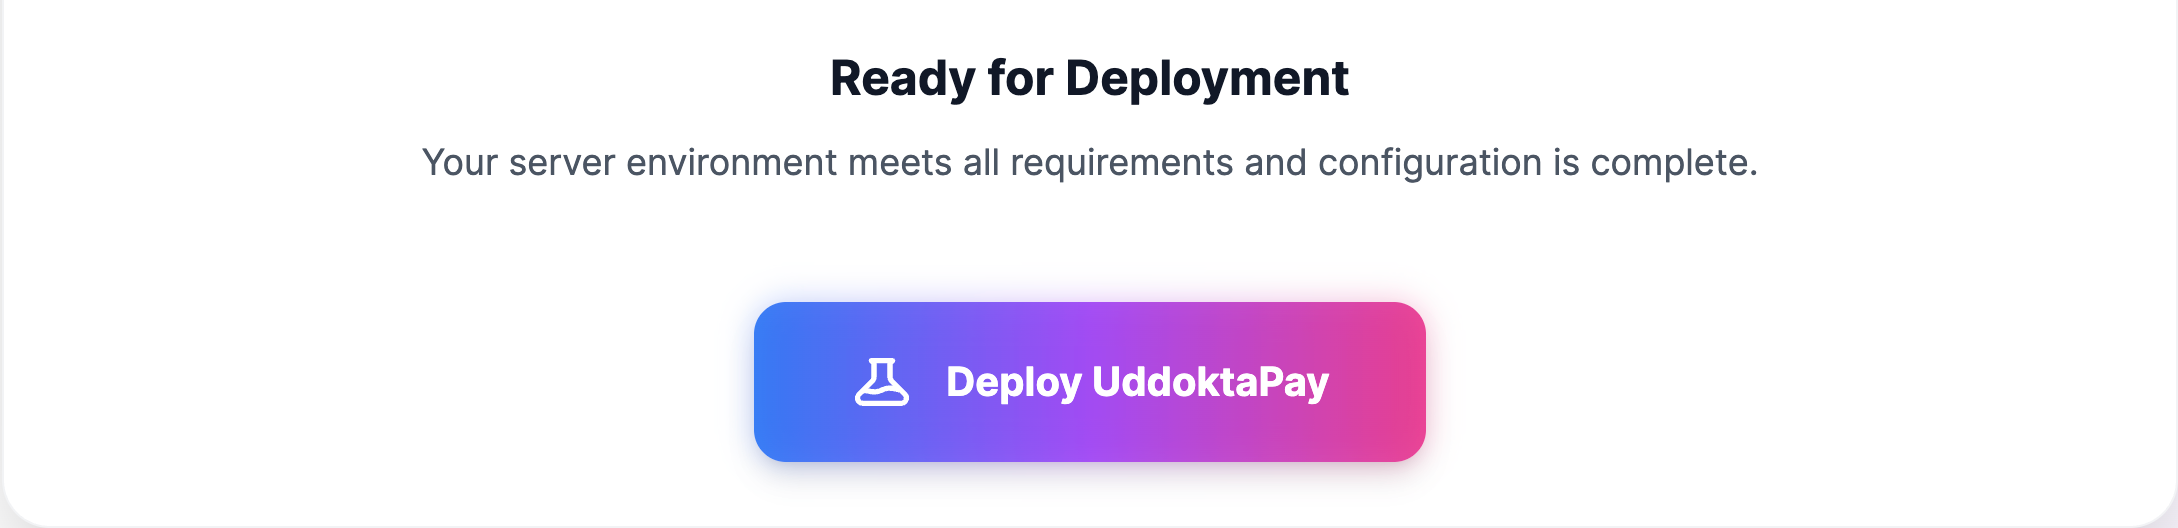
Step 8: Deploy Application
Complete the installation by deploying UddoktaPay to your server.
Start Deployment
After successful admin validation, click Deploy UddoktaPay button
Deployment Process
The installer automatically performs these operations:
- ✅ Validating system requirements and configurations
- ✅ Creating environment configuration files
- ✅ Running database migrations and creating tables
- ✅ Seeding initial system data and settings
- ✅ Setting up file permissions for directories
- ✅ Configuring application security settings
- ✅ Creating administrator account in database
- ✅ Optimizing application cache and routes
- ✅ Finalizing installation and cleanup
Typical deployment time: 2-5 minutes
Critical: Do Not Interrupt Deployment
While deployment is running:
- ❌ Do not close the browser tab or window
- ❌ Do not click the browser back button
- ❌ Do not navigate away from the page
- ❌ Do not refresh or reload the page
- ❌ Do not close your laptop or put it to sleep
Interrupting deployment will:
- Corrupt the installation
- Leave database in incomplete state
- Require deleting all files and starting over
If deployment is interrupted:
- Delete all files from
public_html - Drop and recreate the database
- Start installation from Step 3
Monitor Deployment Progress
During deployment, you'll see:
- Progress indicator or loading animation
- Status messages showing current operation
- Percentage or step counter (if available)
Do not take any action until you see the success message.
Installation Complete
When deployment finishes successfully:
- ✅ You'll see a "Installation Successful" or similar message
- ✅ The page may automatically redirect to the admin login page
- ✅ Your UddoktaPay installation is ready to configure
Step 9: Access Admin Panel
Log into your UddoktaPay administrative interface for the first time.
Navigate to Admin Login
- Open your web browser
- Go to your admin login URL:
https://pay.yourdomain.com/admin - The login page loads
First Login
- Enter your admin email address (from Step 7)
- Enter your admin password (from Step 7)
- Click Login button
Bookmark Admin URL
Save your admin panel URL (https://pay.yourdomain.com/admin) in your browser bookmarks for quick access. You'll use this frequently.
Next Steps
Your hPanel installation is complete! Continue with the essential configuration steps:
Post-Installation Configuration →
- Validate license (required immediately)
- Configure cron job (required immediately)
- Set up brand settings
- Configure email delivery
Installation Complete!
Your UddoktaPay payment gateway is now installed on hPanel. Continue to Post-Installation Configuration → to complete the setup.