cPanel Installation Guide
- Introduction
- Prerequisites
- Installation Overview
- Step 1: Create Subdomain
- Step 2: Upload Installer File
- Step 3: Extract Installer Files
- Step 4: Create Database
- Step 5: Configure Database Connection
- Step 6: Create Admin Account
- Step 7: Deploy Application
- Step 8: Access Admin Panel
- Next Steps
Introduction
This comprehensive guide walks you through installing UddoktaPay on cPanel hosting environments. The installation process is straightforward and takes approximately 15-20 minutes from start to finish.
All screenshots are taken from cPanel's Jupiter theme (latest version). Your interface may appear slightly different depending on your hosting provider's cPanel theme, but functionality remains identical across all versions.
Prerequisites
Before beginning installation, verify you have the following:
Hosting Requirements:
- Active cPanel hosting account (cPanel 11.108 or higher recommended)
- PHP 8.2 or higher with IonCube Loader support
- MySQL 5.7+ or MariaDB 10.3+ database support
- Minimum 512MB PHP memory_limit
- SSL certificate (recommended for production use)
Installation Materials:
- Domain or subdomain pointed to your hosting server
- UddoktaPay installer file downloaded from my.uddoktapay.com
- Valid license key from my.uddoktapay.com
System Requirements
Ensure your hosting environment meets all requirements before proceeding. Installation will fail if PHP version or required extensions are missing.
Installation Overview
The installation process follows six main steps:
- Create Subdomain — Set up dedicated subdomain for UddoktaPay
- Upload Files — Transfer installer package to your server
- Extract Files — Unzip installer in subdomain directory
- Create Database — Set up MySQL database and user
- Run Installer — Configure database connection
- Create Admin — Set up administrator account
Estimated completion time: 15-20 minutes
Step 1: Create Subdomain
Set up a dedicated subdomain for your UddoktaPay installation.
Access Domains Section
- Log into your cPanel account
- Use the search bar at the top and type "Domains"
- Click Domains from the search results

Alternative: Navigate to the Domains section in cPanel home and click Domains.
Create New Subdomain
- Click Create A New Domain button in the top right corner
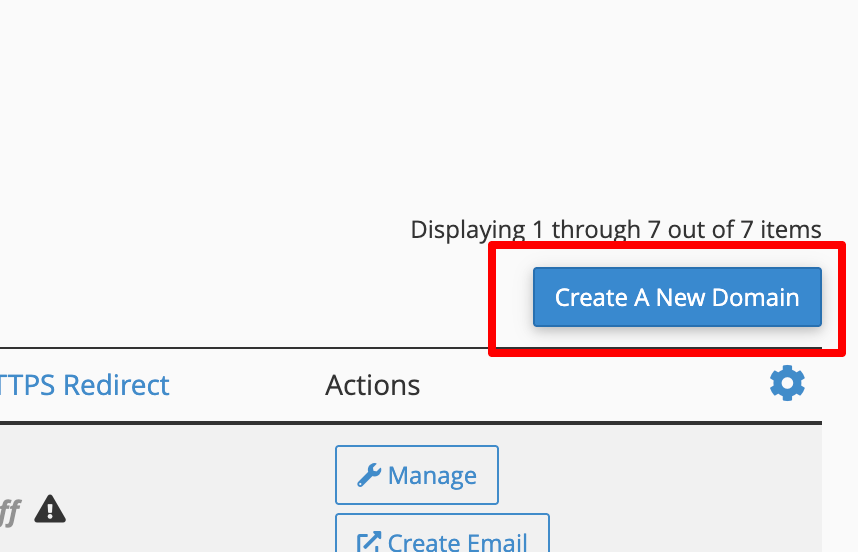
- Fill in the domain creation form:
- Domain — Enter your subdomain (e.g.,
pay.example.com) - Document Root — Auto-populates as
/public_html/pay.example.com - Share document root — Leave unchecked to keep subdomain separate
- Domain — Enter your subdomain (e.g.,
- Click Submit to create the subdomain
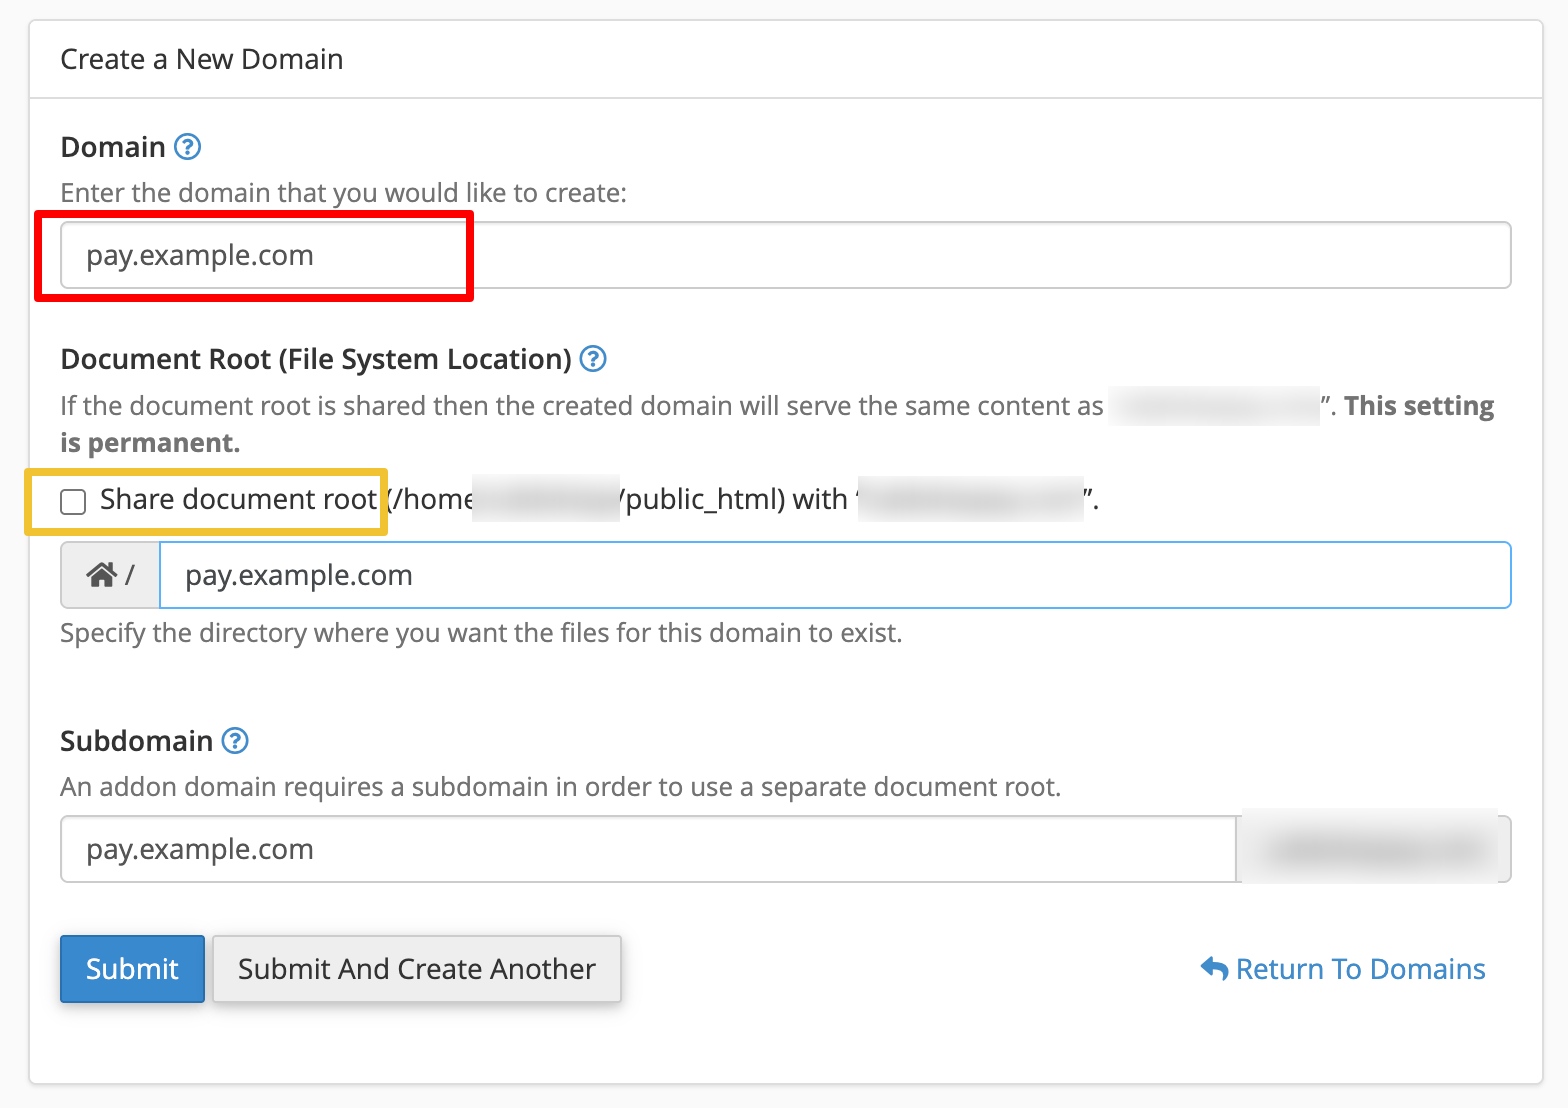
Verify Subdomain Creation
After creation, verify your subdomain appears in the domains list with the correct document root path.
Quick File Manager Access
Click the document root path (e.g., /pay.example.com) in the subdomain list to open File Manager directly in that folder. This saves navigation time in the next step.
Subdomain naming recommendations:
- ✅ Use clear names:
pay.yourdomain.com,payment.yourdomain.com,gateway.yourdomain.com - ❌ Avoid:
test123.yourdomain.com, overly complex names, or random strings
Step 2: Upload Installer File
Transfer the UddoktaPay installer package to your subdomain directory.
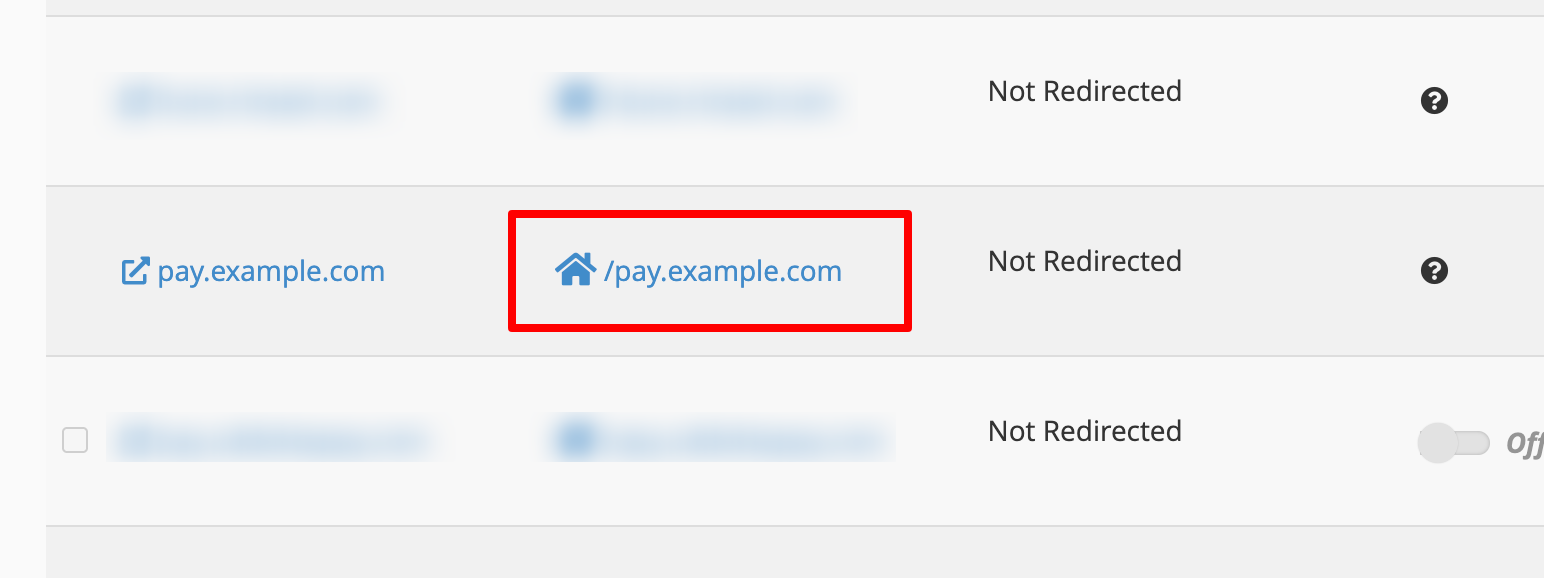
Open File Manager
Quick Method (Recommended):
- From the Domains page, click the document root path link (e.g.,
/pay.example.com) - File Manager opens directly in your subdomain folder
Alternative Method:
- Navigate to Files section in cPanel home
- Click File Manager
- Browse to
pay.example.com
Upload Installer Package
- Click Upload button in the top toolbar
- On the upload page:
- Drag and drop the
installer_****.zipfile into the upload area - Or click Select File to browse and select the file
- Drag and drop the
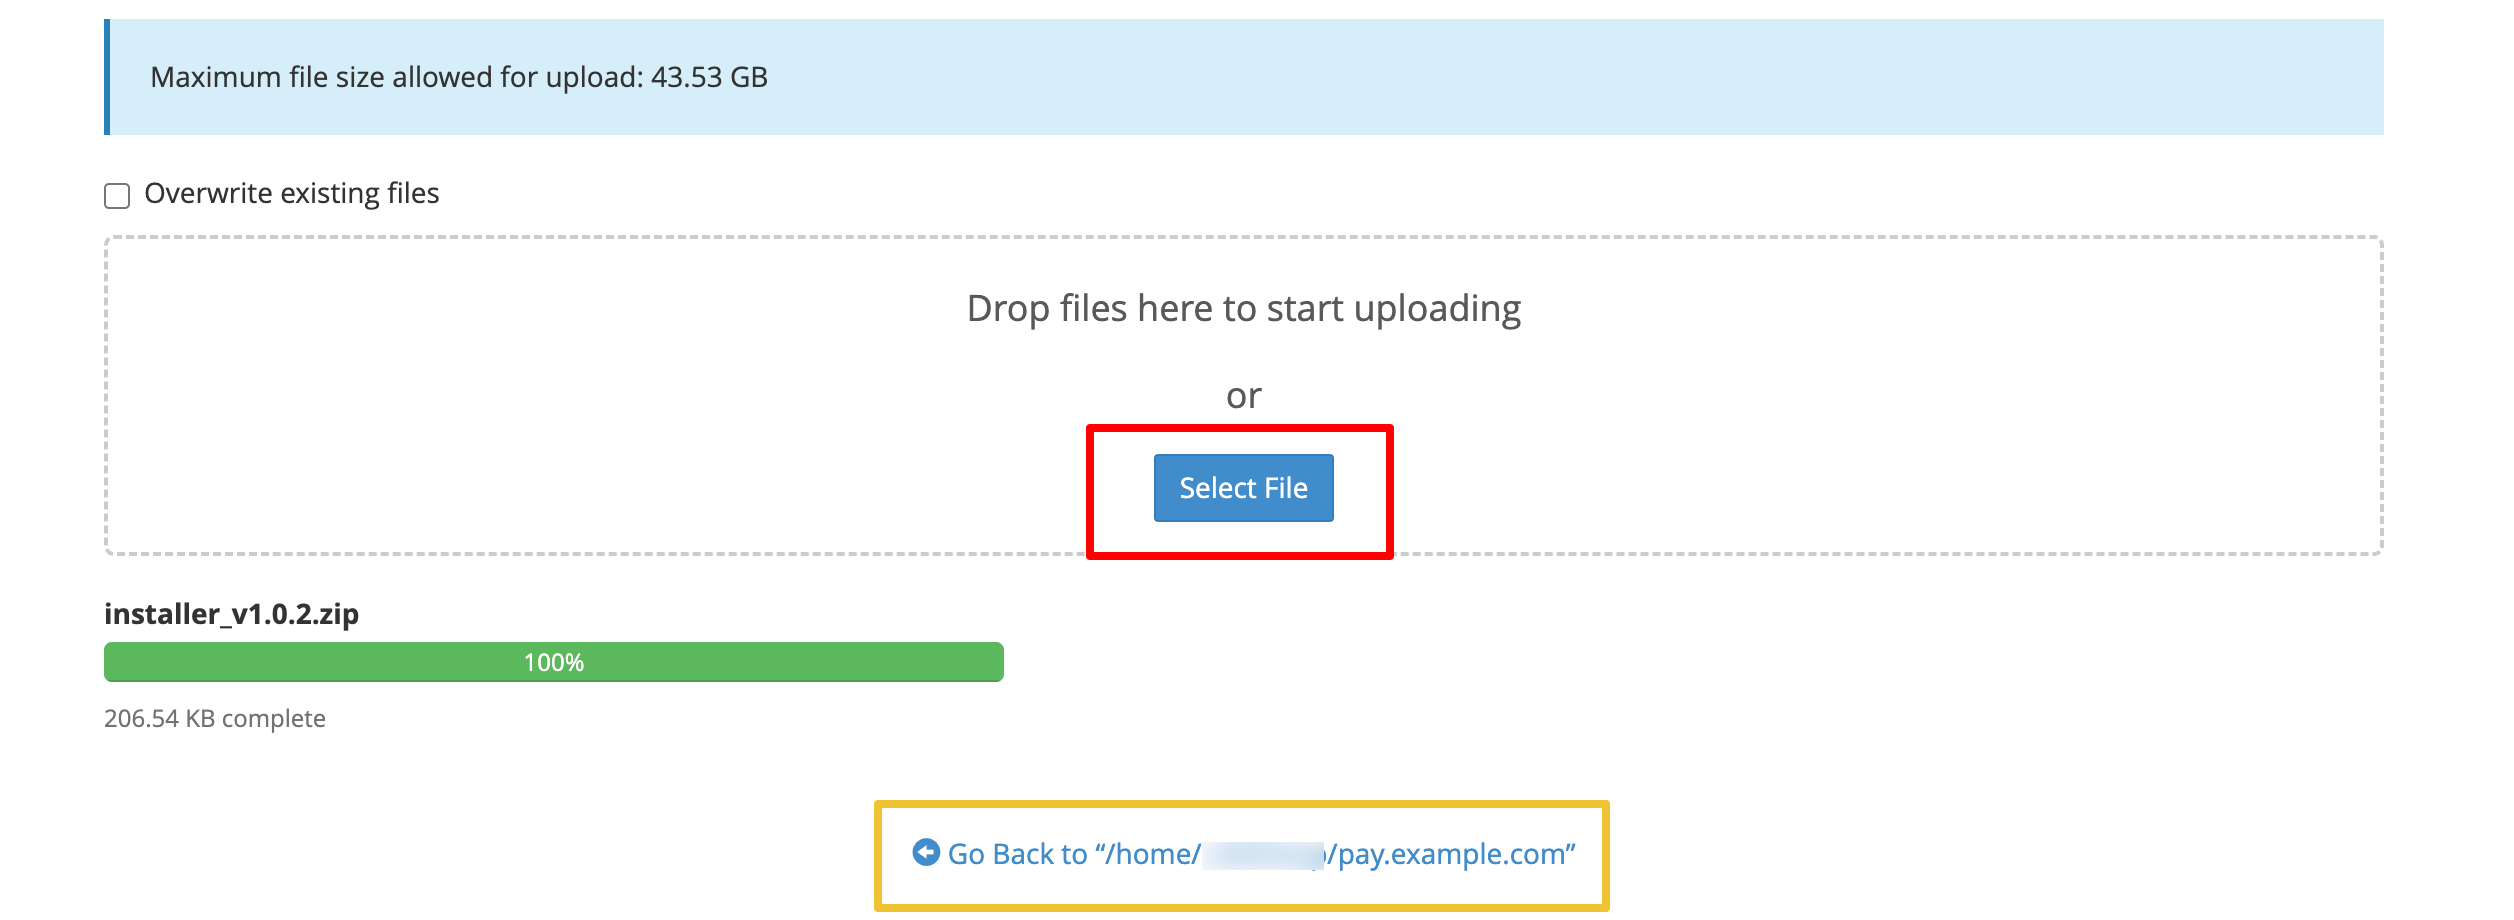
- Wait for upload to complete (green progress bar shows 100%)
- Click Go Back to link to return to your subdomain folder
Step 3: Extract Installer Files
Unzip the installer package in your subdomain directory.
Locate and Select Installer
- In File Manager, locate
installer_****.zipin your subdomain folder - Click the filename to select it (file row becomes highlighted)
- Click Extract button in the top toolbar
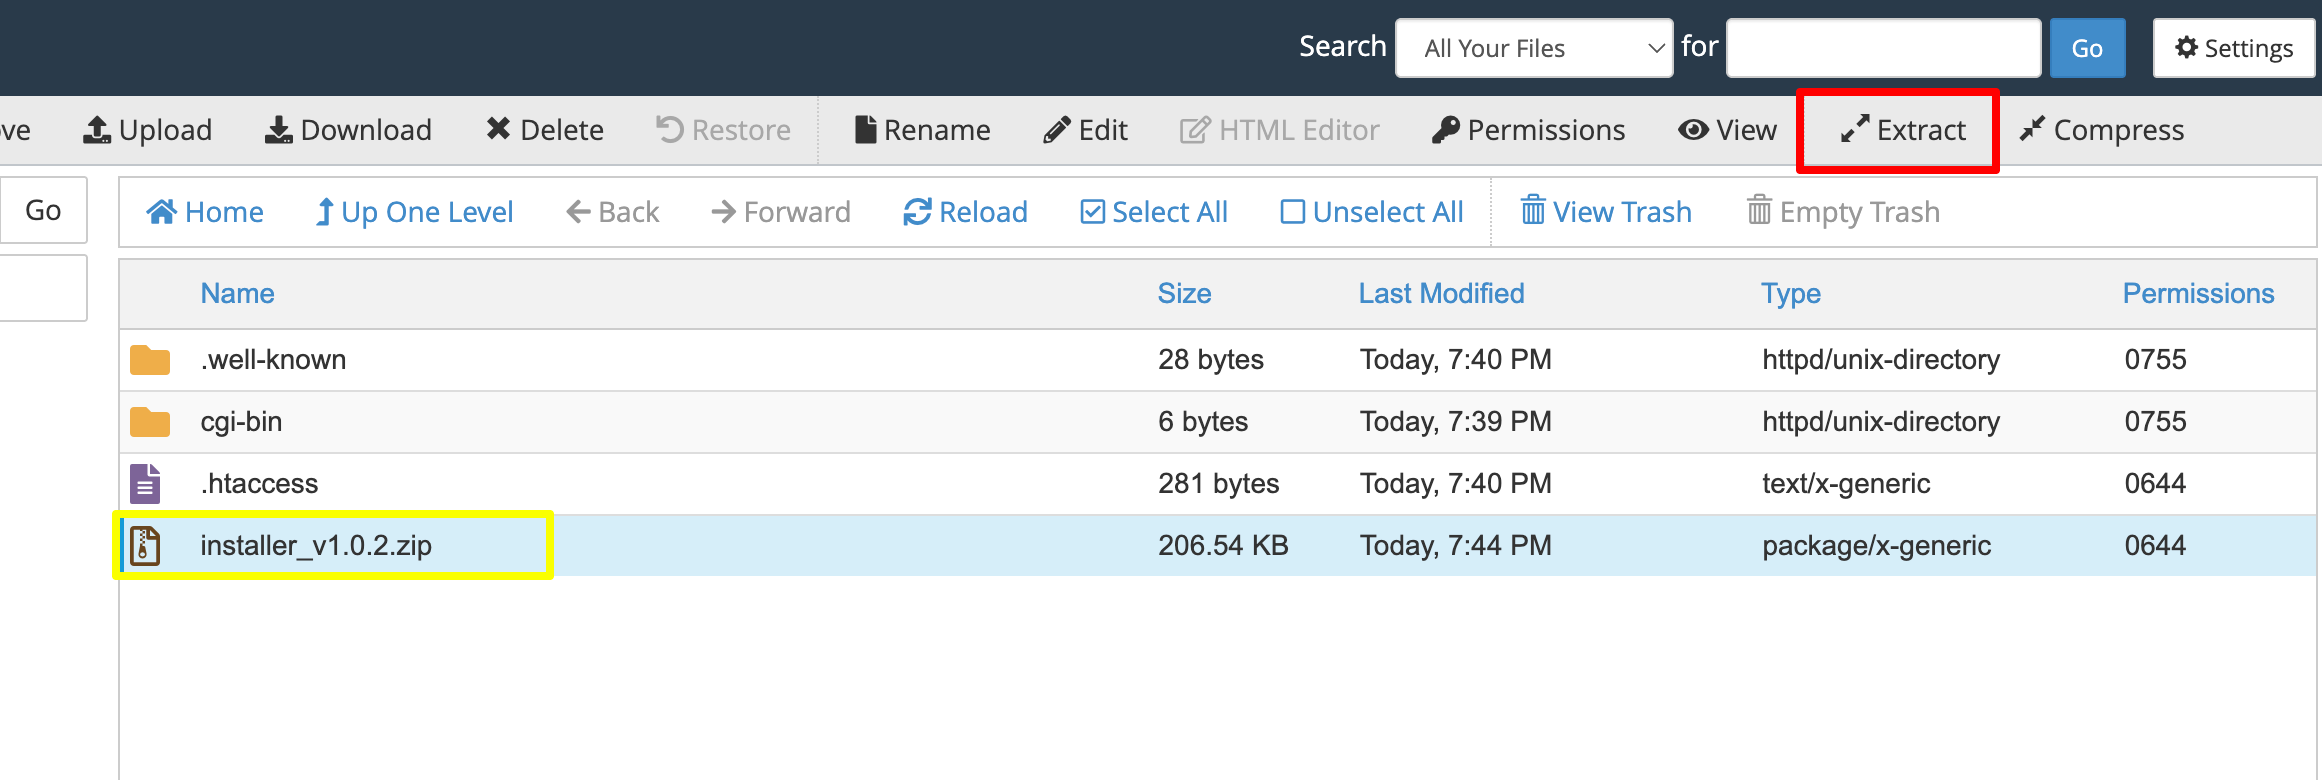
Extract Files
- In the extract dialog:
- Verify extraction path shows your subdomain folder (e.g.,
/pay.example.com) - Click Extract File(s) button
- Verify extraction path shows your subdomain folder (e.g.,

- Wait for extraction to complete
- Click Close when finished
Clean Up (Optional)
After successful extraction, you can delete the installer ZIP file to save disk space:
- Select the
installer_****.zipfile - Click Delete button in toolbar
- Confirm deletion when prompted
After extraction, you should see:
publicfolder.htaccessfile- Other installation files and directories
Step 4: Create Database
Create a MySQL database using cPanel's Database Wizard for guided setup.
Access Database Wizard
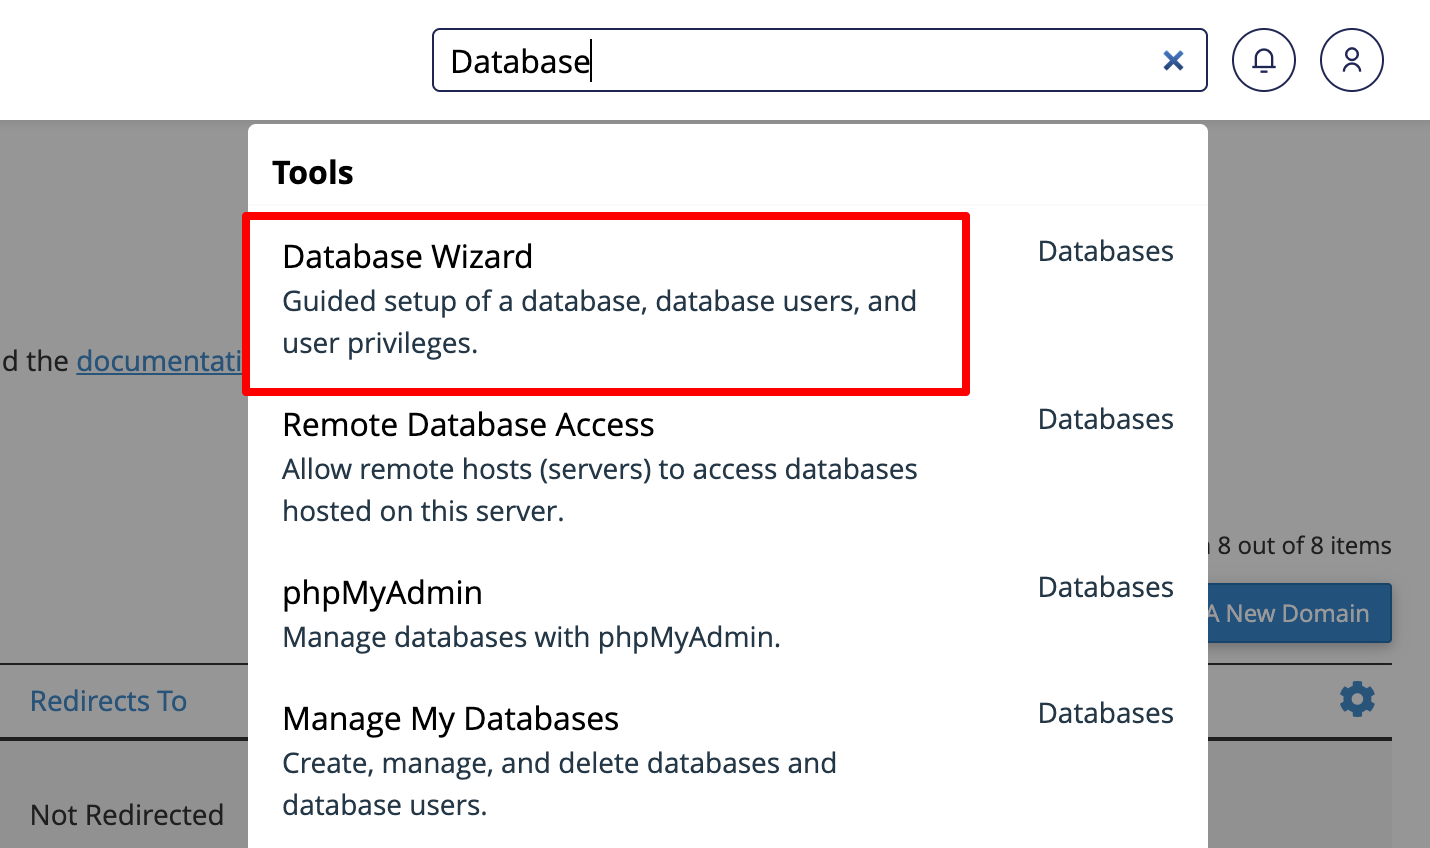
- Return to cPanel home page
- Search for "Database" in the search bar
- Click Database Wizard under Tools section
Database Creation Methods
cPanel offers two methods for creating databases:
- Database Wizard — Step-by-step guided process (recommended for beginners)
- MySQL Databases — Manual setup for experienced users
This guide uses Database Wizard for simplicity and reliability.
Step 1: Create Database
- Enter database name in the New Database field
- cPanel automatically prefixes with your username (e.g.,
username_example) - Use a descriptive name like
uddoktapayorpayment
- cPanel automatically prefixes with your username (e.g.,
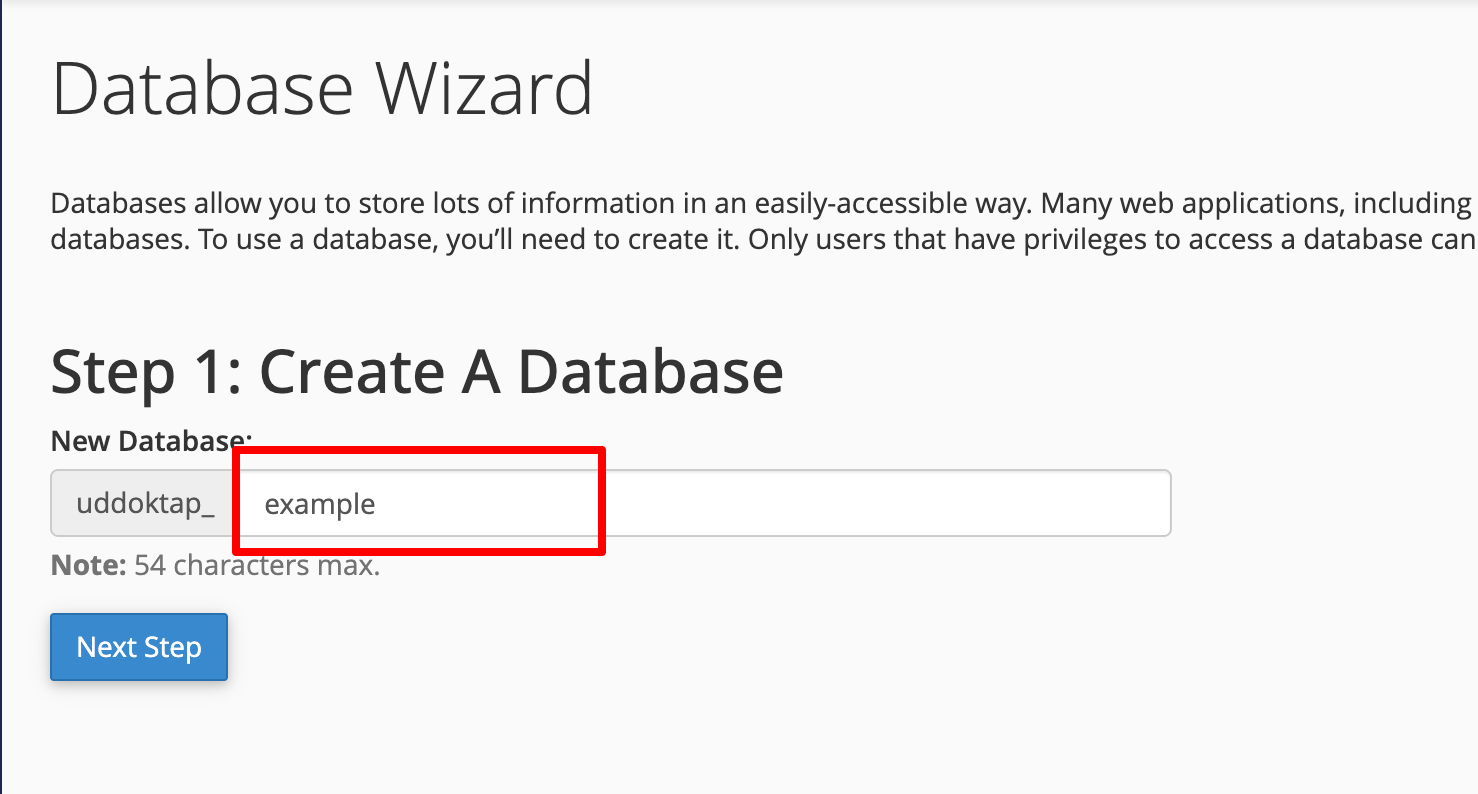
- Click Next Step to continue
Record Database Name
Note the complete database name including the prefix (e.g., username_uddoktapay). You'll need this exact name when configuring the installer.
Step 2: Create Database User
Enter Username for the database user
- Also prefixed with your cPanel username
- Example:
dbuserbecomesusername_dbuser
Create a strong Password:
- Use the Password Generator for maximum security
- Or create your own (minimum 8 characters)
- Include uppercase, lowercase, numbers, and special characters
- Password strength meter should show "Very Strong (100/100)"
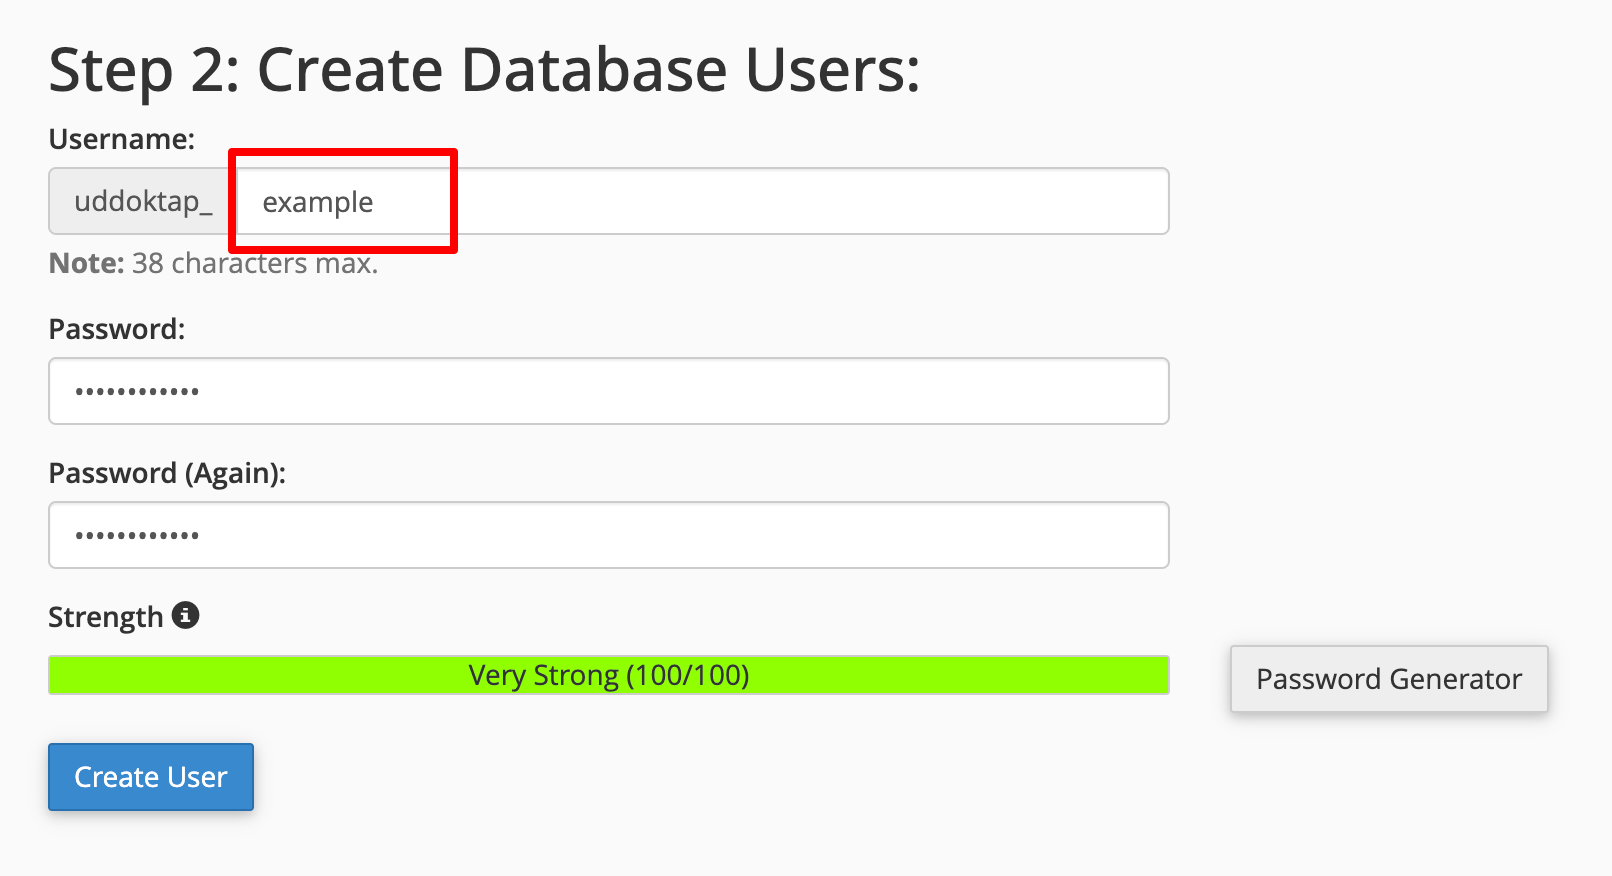
- Click Create User to proceed
Secure Storage Required
Save these database credentials immediately in a password manager or secure document. You cannot retrieve the password later from cPanel.
Step 3: Set User Privileges
- Check ALL PRIVILEGES checkbox at the top
- This automatically selects all individual permission checkboxes below
- Required for UddoktaPay to function properly
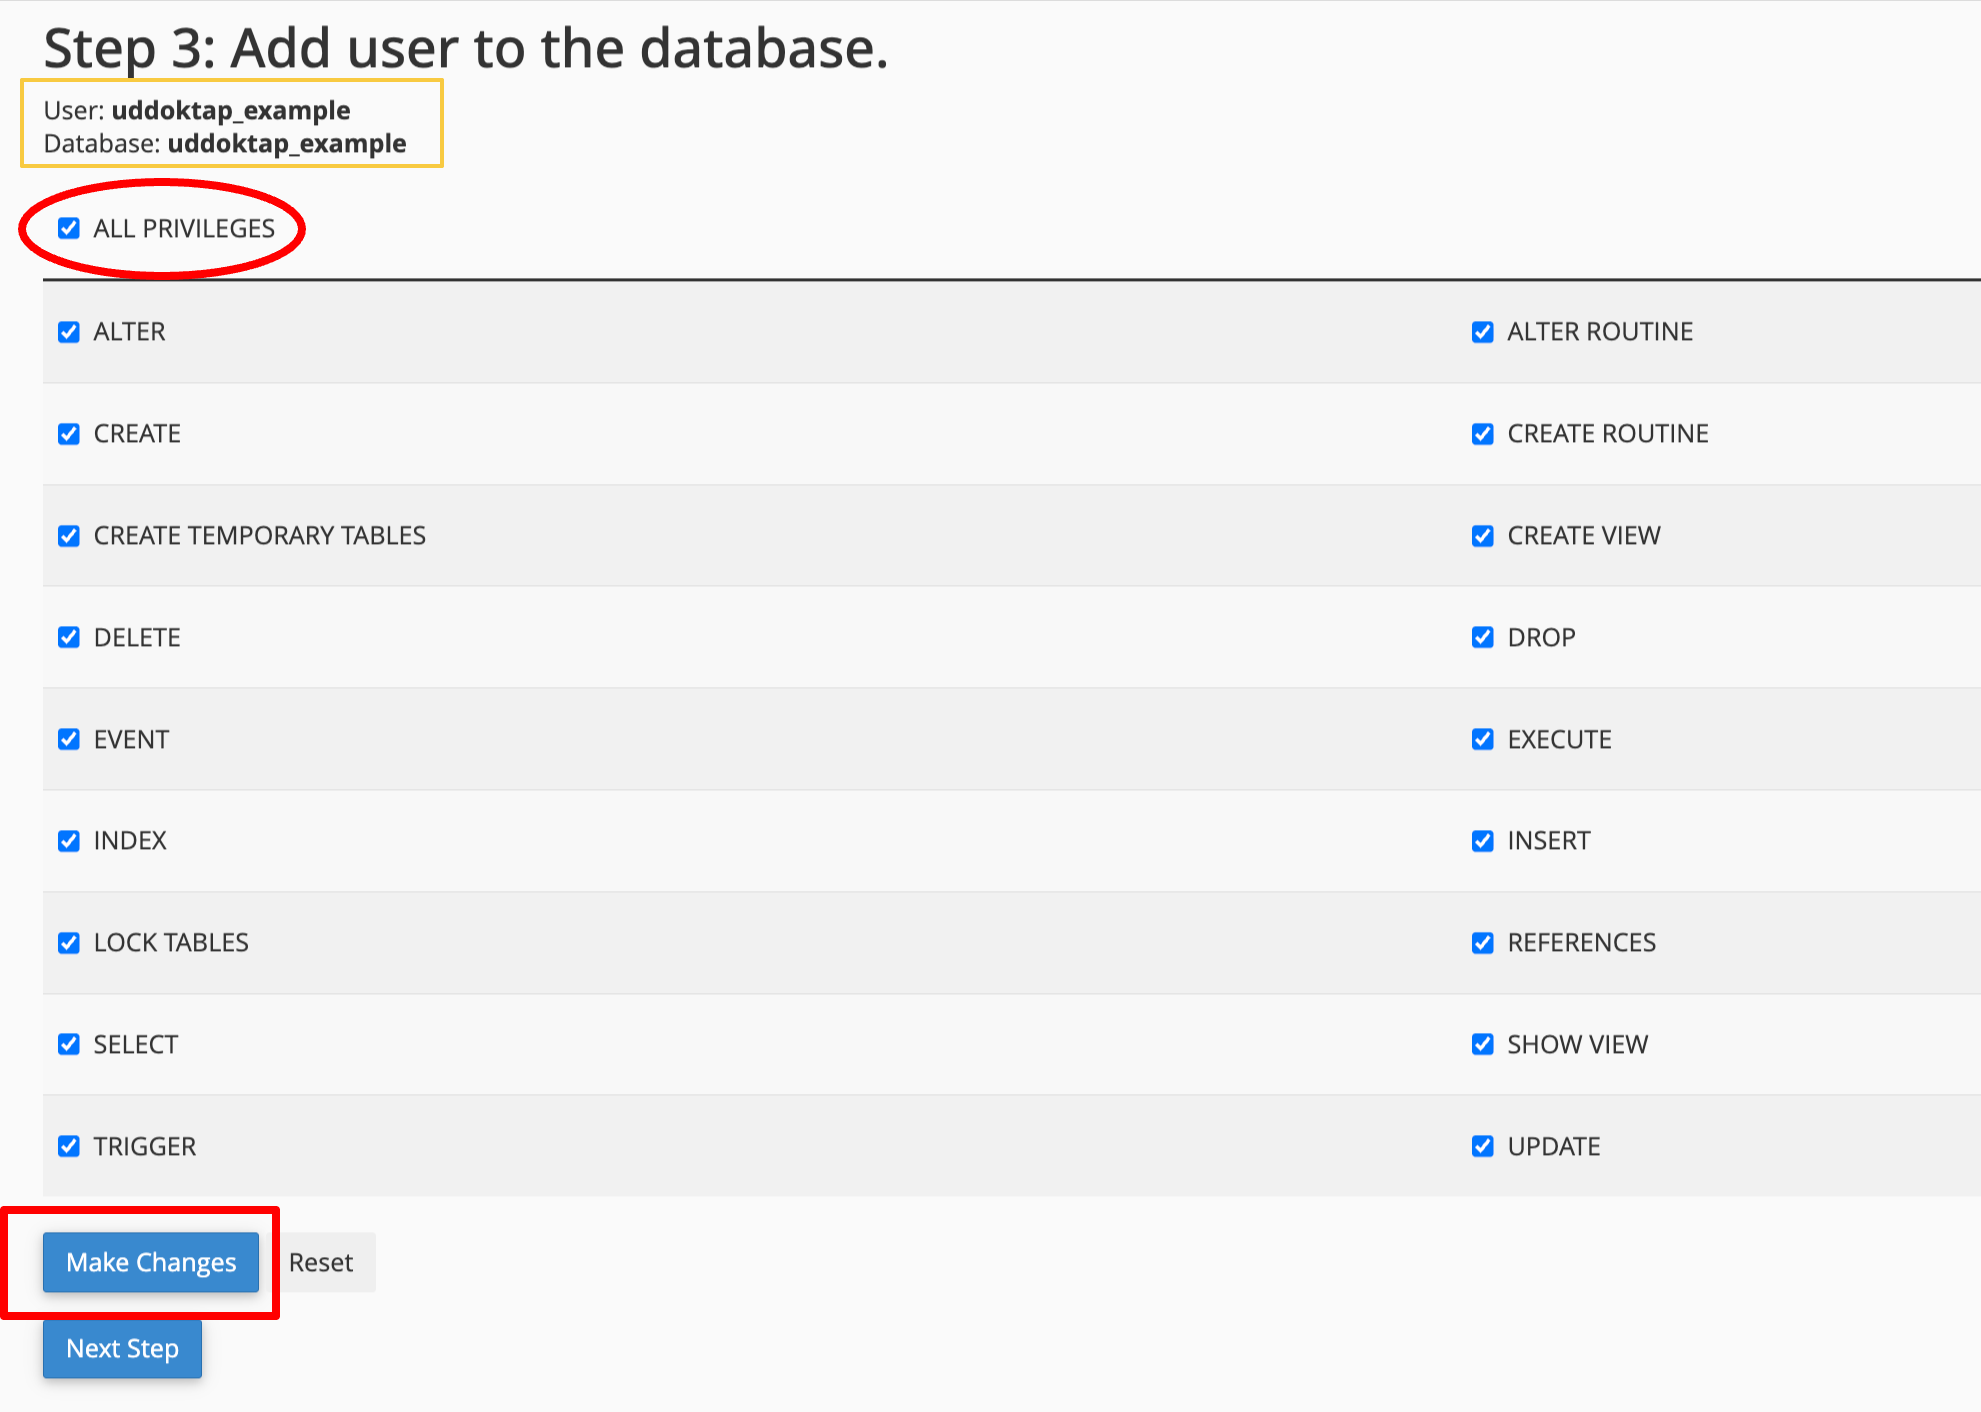
- Click Make Changes button
- Click Next Step to complete the wizard
Your database credentials:
| Credential | Format | Example |
|---|---|---|
| Database Host | localhost or 127.0.0.1 | localhost |
| Database Name | username_dbname | username_uddoktapay |
| Database Username | username_dbuser | username_dbuser |
| Database Password | Your chosen password | ●●●●●●●●●● |
| Database Port | 3306 (default) | 3306 |
Keep these credentials available — you'll need them in the next step.
Step 5: Configure Database Connection
Access the UddoktaPay installer and connect to your database.
Access Installer Interface
- Open your web browser
- Navigate to your subdomain URL (e.g.,
https://pay.example.com) - The installer loads automatically
Verify System Requirements
The installer automatically checks your server environment and displays the results.
If you see "System Ready - All requirements satisfied":
- Proceed to database configuration
- All PHP extensions are properly installed
If you see warnings about missing PHP extensions:
Option 1: Enable Extensions in cPanel
- Return to cPanel home
- Navigate to Software section
- Click Select PHP Version
- Check boxes for missing extensions
- Click Save and refresh the installer page
Option 2: Contact Hosting Provider If you cannot enable extensions yourself:
- Contact your hosting provider's support
- Request PHP 8.2 or higher with IonCube Loader
- Provide the list of missing extensions from the installer
Common Missing Extensions
Most frequently missing extensions:
- IonCube Loader (required)
- mbstring
- pdo_mysql
- openssl
- tokenizer
- bcmath
- fileinfo
Configure Database Connection
- Click Configure Database Connection button
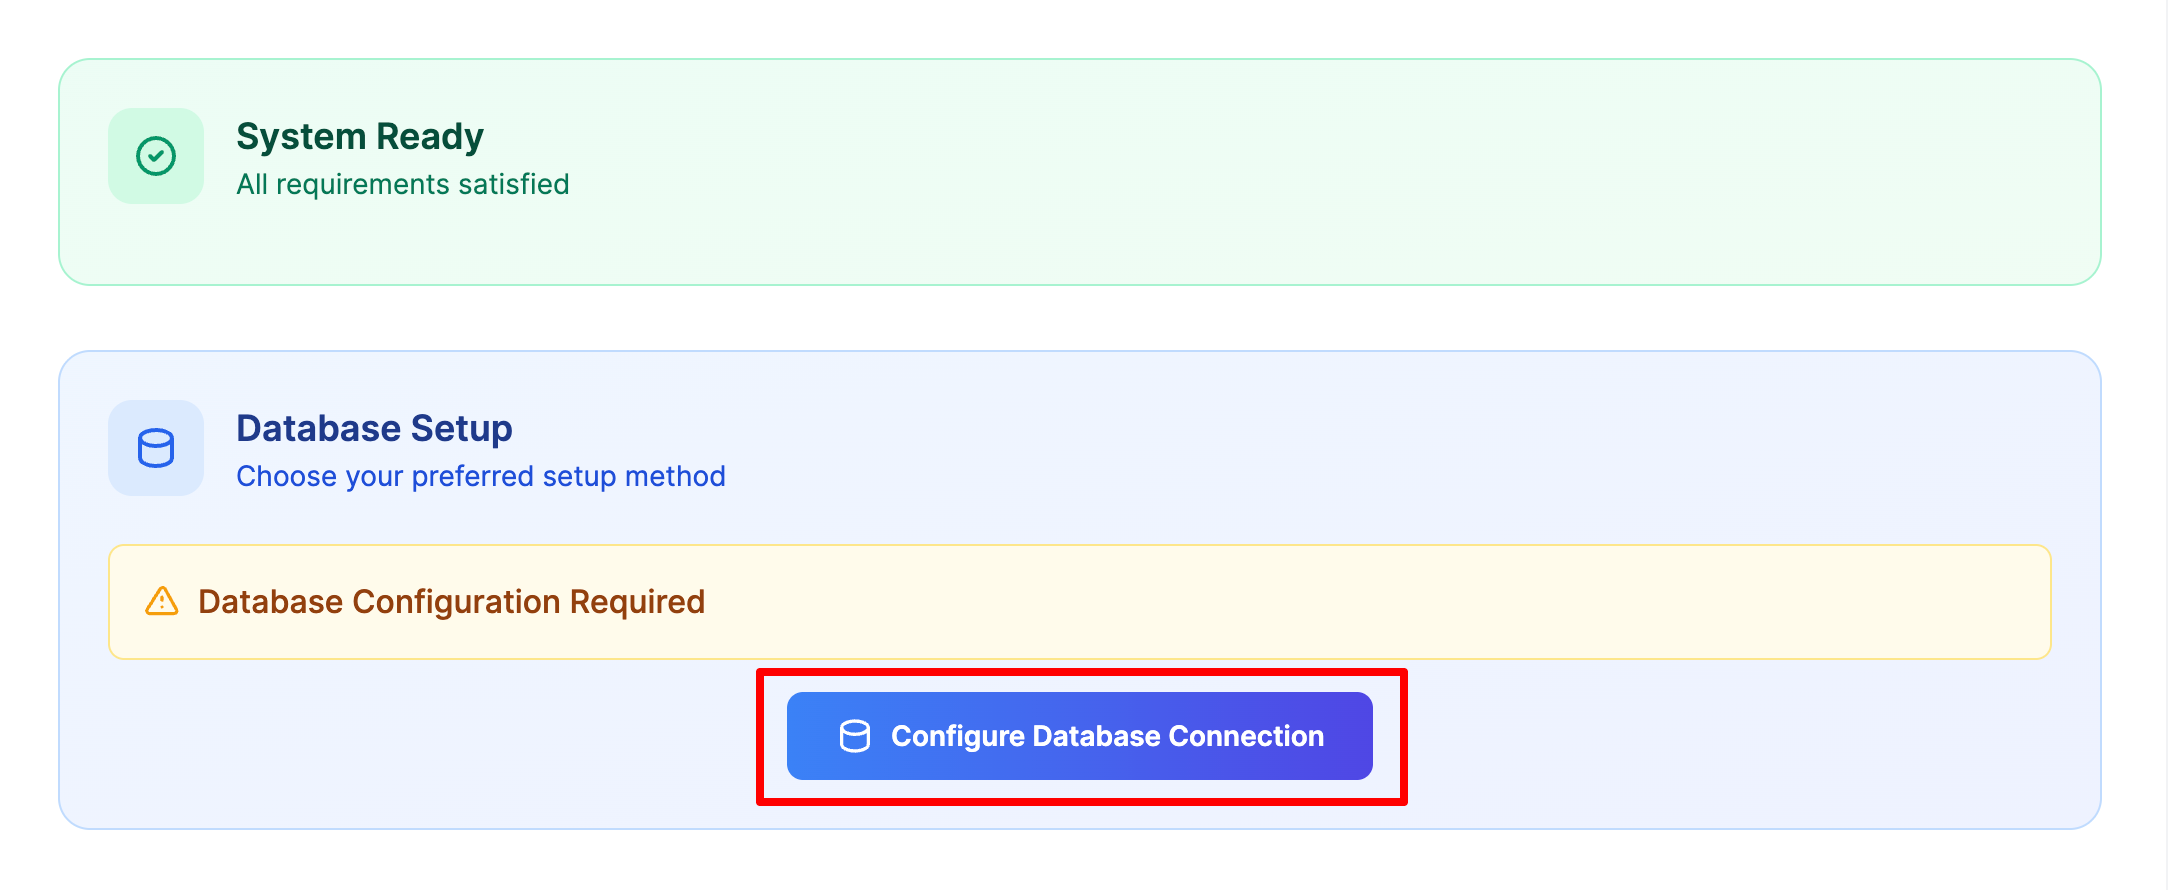
The database configuration form appears
Select MySQL as the Database Driver

- Fill in your database credentials:
| Field | Value | Notes |
|---|---|---|
| Database Driver | MySQL | Select it |
| Host | 127.0.0.1 | Or try localhost if connection fails |
| Port | 3306 | Default MySQL port |
| Database Name | Full name with prefix | Example: username_uddoktapay |
| Username | Full username with prefix | Example: username_dbuser |
| Password | Your database password | Exact password from Step 4 |

- Click Test Connection button to verify credentials
Common connection mistakes:
- ❌ Forgetting the username prefix in database name or username
- ❌ Using
localhostwhen127.0.0.1is required (or vice versa) - ❌ Copy-paste errors introducing extra spaces in password
- ❌ Using wrong port number
Connection Testing
If connection fails with localhost, try 127.0.0.1 as the host. Some servers require one specific format.
Step 6: Create Admin Account
Set up your administrator account to manage UddoktaPay.
Enter Admin Credentials
Fill in the admin account creation form with your details:
| Field | Description | Requirements |
|---|---|---|
| Admin Email | Your email address | Valid email format; used for login |
| Password | Administrator password | Minimum 12 characters recommended |
| Confirm Password | Repeat password | Must match password field exactly |
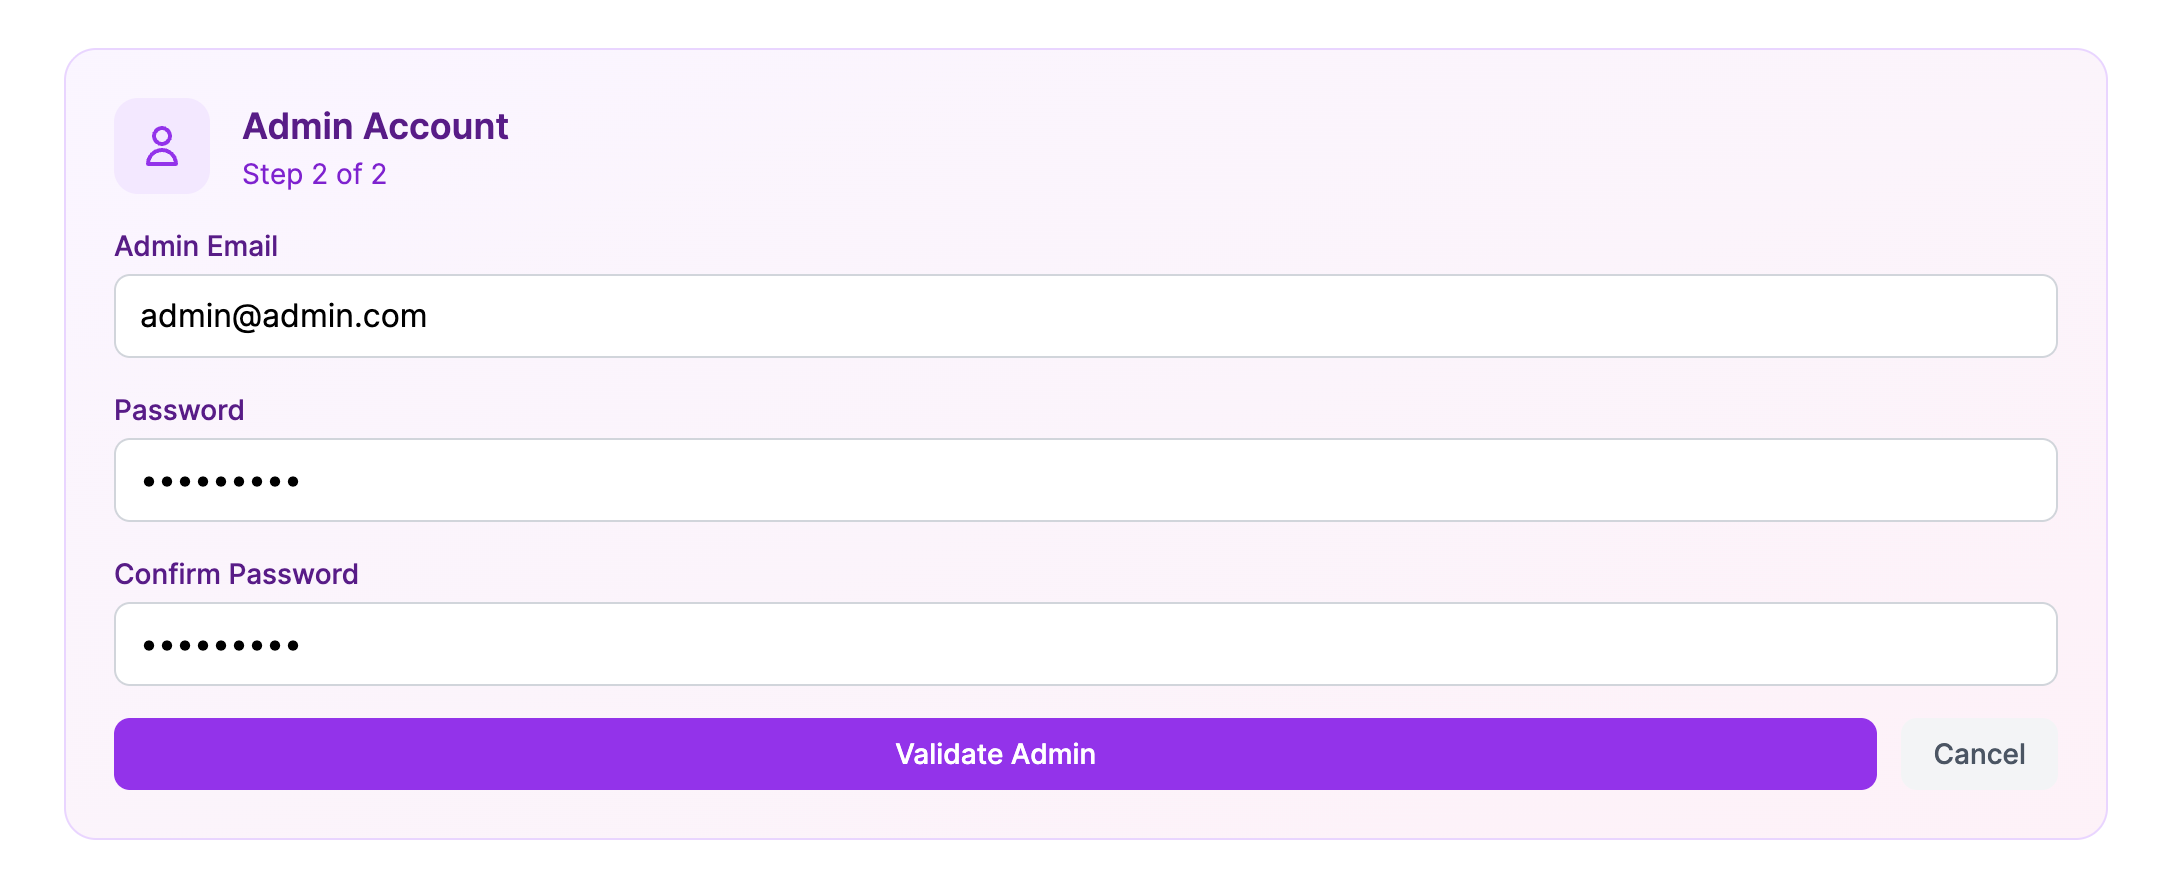
Validate Admin Account
- Double-check all information is correct
- Click Validate Admin button to verify
Admin password security requirements:
- ✅ Minimum 12 characters (longer is better)
- ✅ Mix of uppercase and lowercase letters
- ✅ Include numbers and special symbols
- ✅ Never reuse passwords from other services
- ✅ Avoid personal information (names, birthdates, phone numbers)
- ✅ Use a password manager to generate and securely store
Critical Security Warning
This account has complete administrative access to your payment gateway. Use an extremely strong, unique password and enable two-factor authentication immediately after first login.
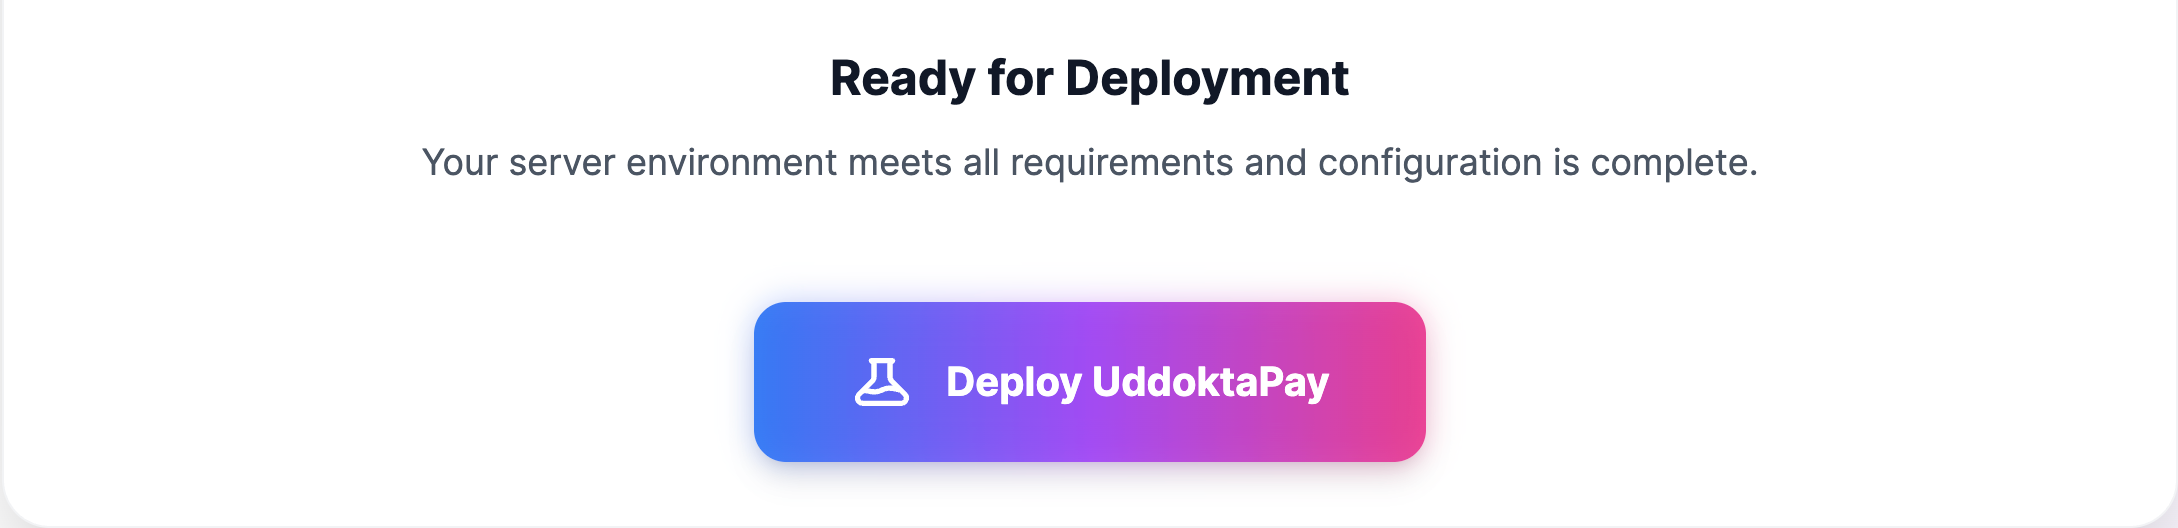
Step 7: Deploy Application
Complete the installation by deploying UddoktaPay to your server.
Start Deployment
After successful admin validation, click Deploy UddoktaPay button
Deployment Process
The installer automatically performs these operations:
- ✅ Validating system requirements and configurations
- ✅ Creating environment configuration files
- ✅ Running database migrations and creating tables
- ✅ Seeding initial system data
- ✅ Setting up file permissions for directories
- ✅ Configuring application security settings
- ✅ Creating administrator account
Typical deployment time: 2-5 minutes
Critical: Do Not Interrupt
While deployment is running:
- ❌ Do not close the browser tab or window
- ❌ Do not click the browser back button
- ❌ Do not navigate away from the page
- ❌ Do not refresh or reload the page
Interrupting deployment may corrupt the installation and require starting over.
Installation Complete
When deployment finishes successfully:
- You'll see a confirmation message
- The page automatically redirects to the admin login page
- Your UddoktaPay installation is ready to configure
Step 8: Access Admin Panel
Log into your UddoktaPay administrative interface for the first time.
First Login
- Navigate to your admin login URL:
https://pay.yourdomain.com/admin - Enter your admin email address
- Enter your admin password
- Click Login button
Next Steps
Your cPanel installation is complete! Continue with the essential configuration steps:
Post-Installation Configuration →
- Validate license (required immediately)
- Configure cron job (required immediately)
- Set up brand settings
- Configure email delivery
Installation Complete!
Your UddoktaPay payment gateway is now installed on cPanel. Continue to Post-Installation Configuration → to complete the setup.